One of the challenges that saccos face is access to timely and correct information. This is very important in making appropriate business decisions.
For example, records about member loans may be saved in one excel file, whereas member information may be found in its own separate hard copy file.
Because this information is not shared, extracting relevant information becomes difficult.
The FinITC Sacco Management Solution does not have this limitation because all information is found in one common database.
1.1. Real Time
Another typical problem is that information entered in excel files is frequently not available in real-time.
This means that records may be updated only at certain intervals during a period (hour, day, week, or month).
The advantage of the FinITC Sacco Management Solution is that as soon as data is entered into the system,
it becomes instantly available. The disadvantage is that incorrectly entered data will be seen also.
Users must be cautious when they enter data into the system. It is very important that only correct data reside in the system.
1.2. Beyond Sacco Processes
With the FinITC Sacco Management system, saccos can process activity beyond the known sacco processes.
For example, the sacco management systems can support investments and financial accounting.
1.3. Roles and Authorization
Although information in the Sacco management system is readily available, proper authorization is required.
Access to data is frequently determined by one's job role and responsibilities within the sacco. For example,
a sacco member is authorized to create, view, and modify his/her sacco loan, but cannot create new sacco members.
1.4. The Sacco System
The FinITC Sacco Management System is a fully integrated relational database system that lets you enter and maintain financial and other sacco business activities in one place.
This includes the following:
General Ledger
Receivables
Cash Management
Investments
Loans Management
Installation
Yes, the product is cloud by design. No installation files are required.
Using a Sacco Management System in the cloud means always being up-to-date with the latest version of the product.
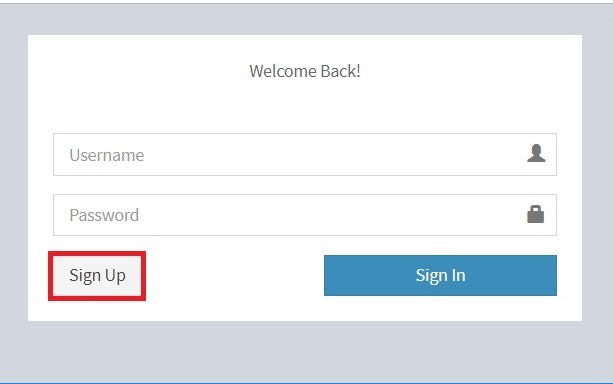
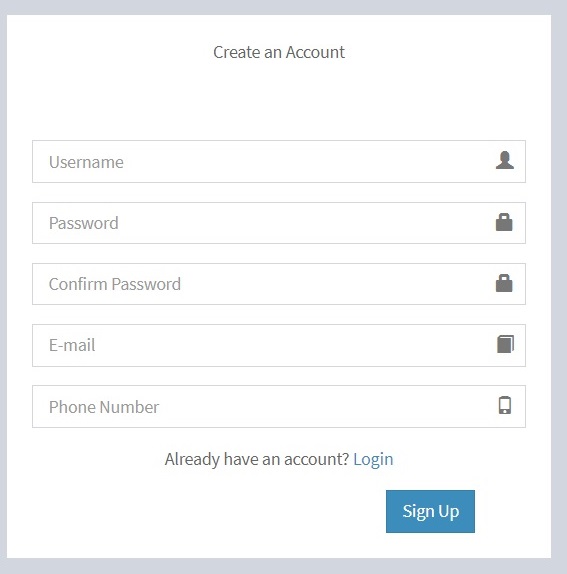
Enter the relevant details in the sign up form and click Sign Up
System Overview
This section introduces the general concepts of the user interface design of the FinITC Sacco Management System.
With the user interface, you can focus, prioritize, and apply your expertise.
Key data is visualized so that you better understand your business.
The user interface has different components, which are discussed.
3.1. Home Page
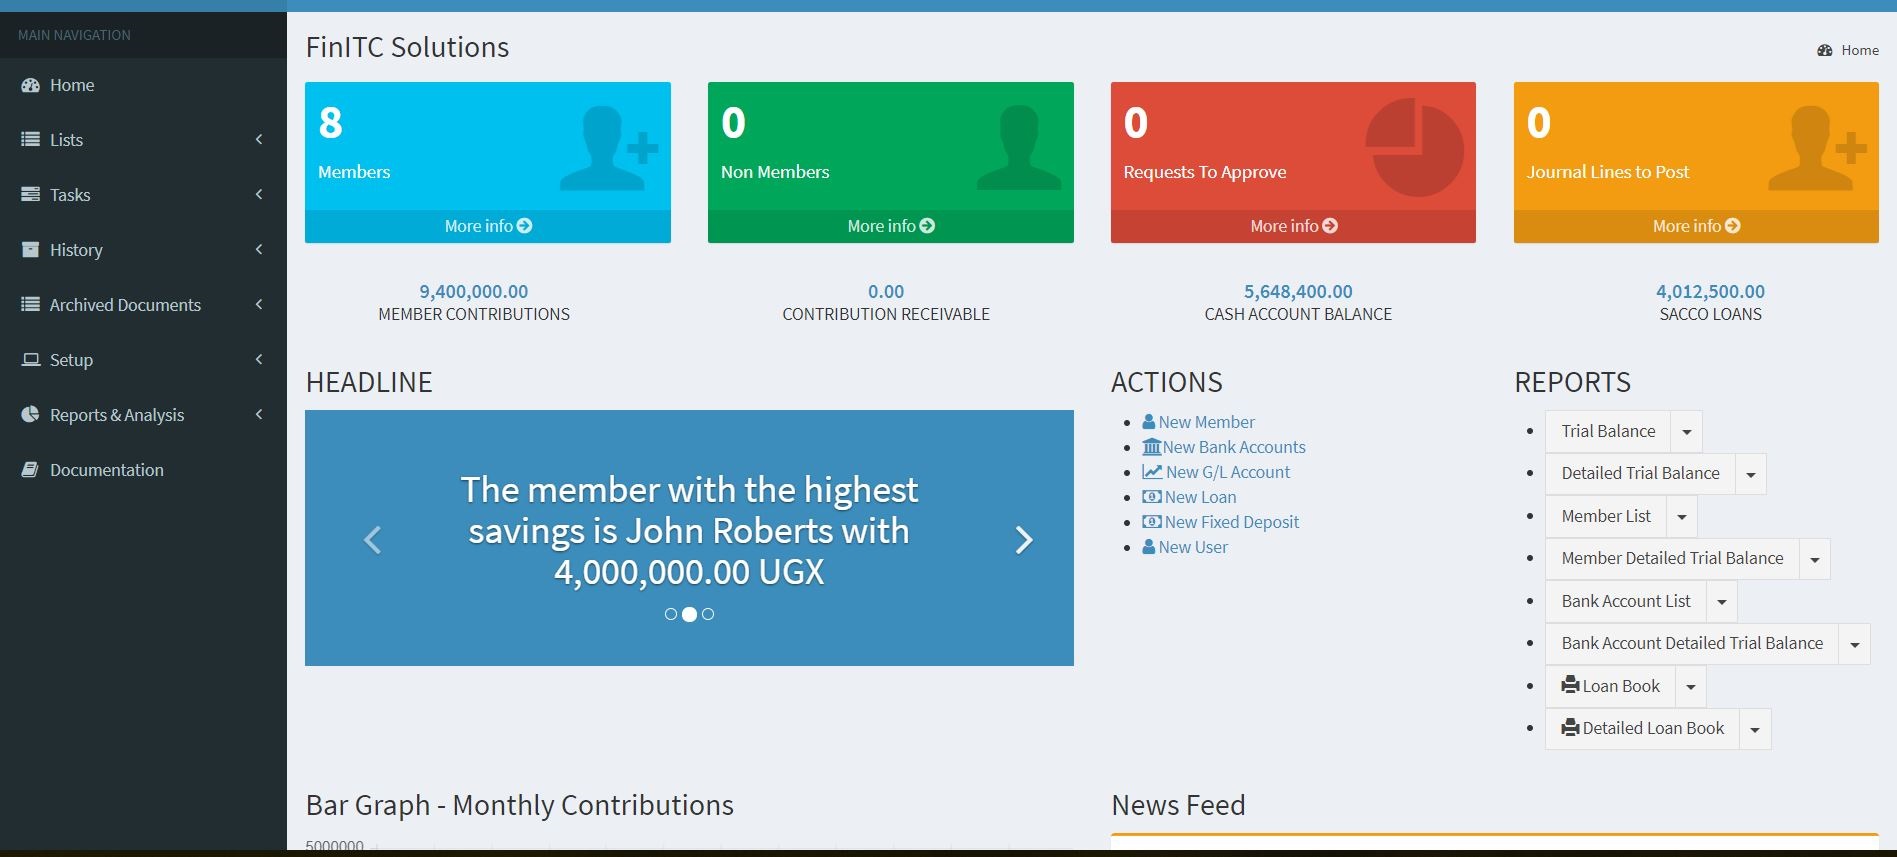
Once the user has been authenticated, they will be redirected to the home page.
Sacco Administrator Home Page
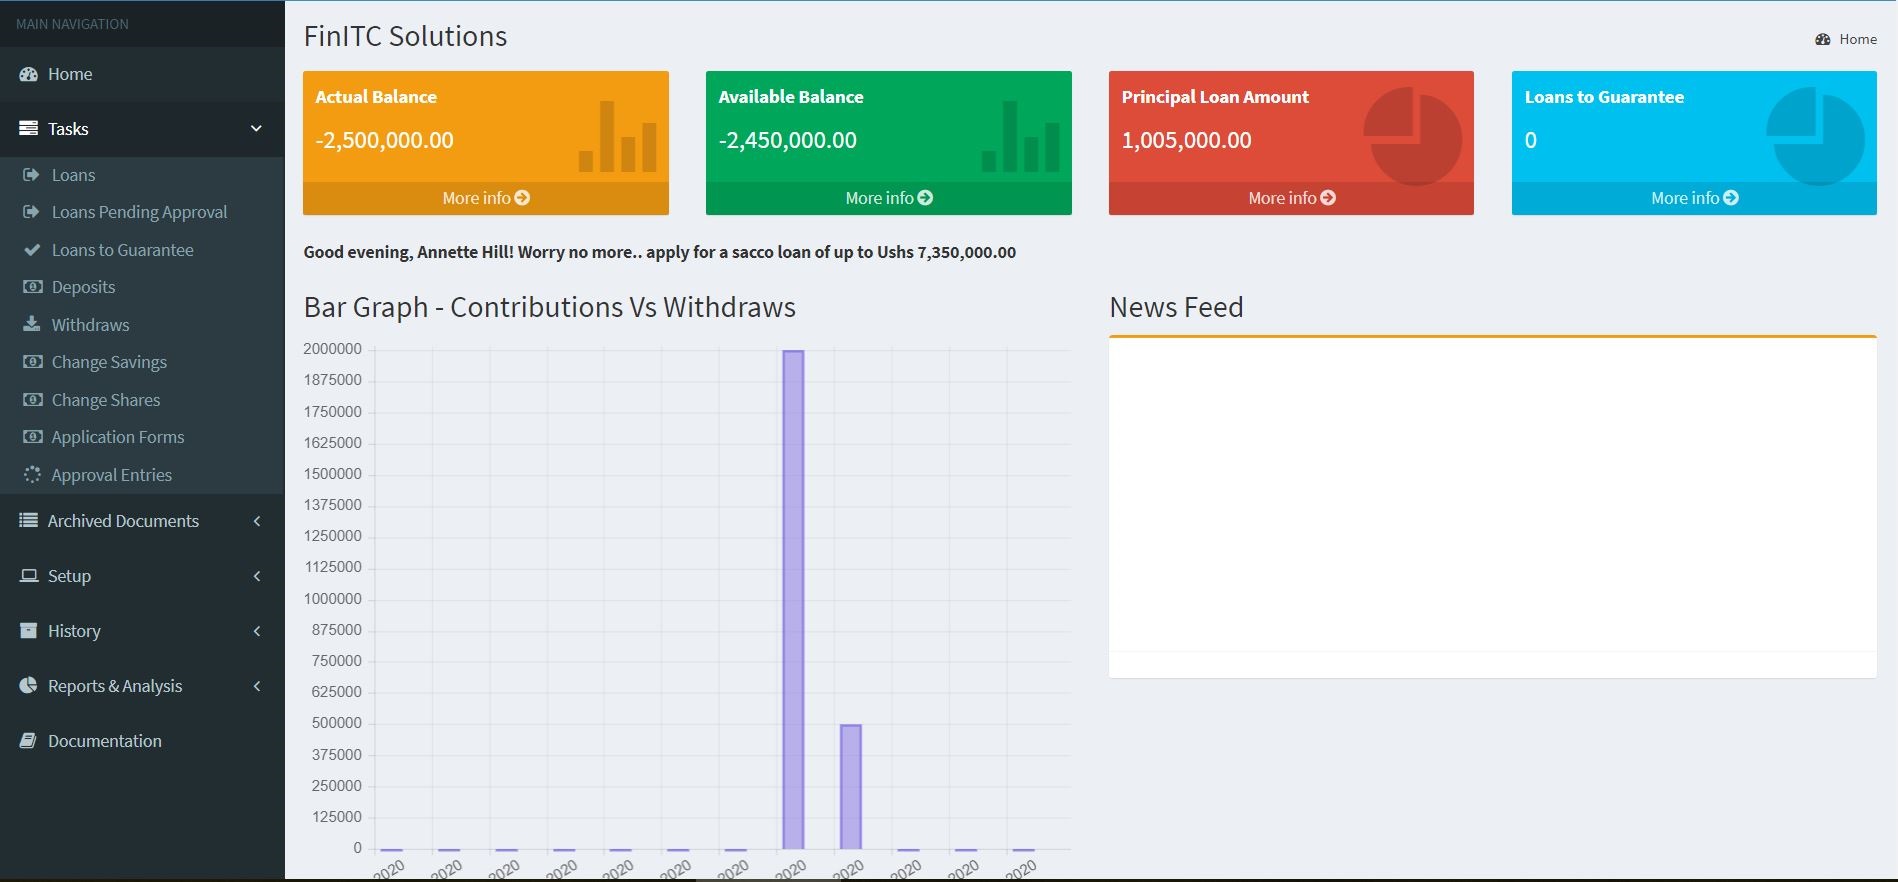
Member Home Page
The Status Bar
The status bar shows the name of the application, the SACCO Code or Location, current date and the user who was logged on to the system. Clicking on the user name shows a drop down that can be used to log out of the application.
Note: To update the active window, you can use the keyboard shortcut F5.
The Navigation Pane
The navigation pane appears on the left side of the user interface. You use the navigation pane to switch between different menus.
From the navigation pane, you can open list places. An example of a list place is the member list. From a list place, you can open individual cards or documents. The navigation pane displays one menu at a time.
At a minimum, the navigation pane contains the following menus:
Home > Lists
Depending on your user profile, various activity buttons may be available, such as the following:
History - The History menu contains the posted entries that are most frequently used by your user role.
Setup - Your navigation pane may also contain setup areas – that can be used to configure the application.
3.2. Pages
Pages are the main way to display and organize data. Pages offer a visual experience. Every user has a Role Center page, customized to the individual needs and tasks that each user performs. Other types of pages, such as list pages might display lists of members or bank accounts, whereas others such as worksheet pages focus on user tasks.
The following page types are available:
Card
List
Role Center
List Page
A list page displays content from a table in a list format.
A list page has the following components:
Ribbon
Filter box
List
If you click on the pencil image or on the No. value on a line in the list, the record opens in a new window in the default mode (Edit, View, or New) of that particular record.
Filter box
You use the filter box to display certain accounts, customers, entries, or other records by specifying criteria for fields in a table.
Card Page
You use a card page to view and edit one record or entity from a table. The card page displays selected fields from the table. An example of how to use a card page is for creating a sacco member.
The Role Center
The Role Center is the central point for all information and actions that you perform in the system. It provides a quick overview of tasks and transactions related to your job role.
The system has two Role Centers i.e. the Sacco Administrator Role Center and the Sacco Member Role Center. The system automatically assigns the role center basing on the entry type i.e sacco admin user or sacco member.
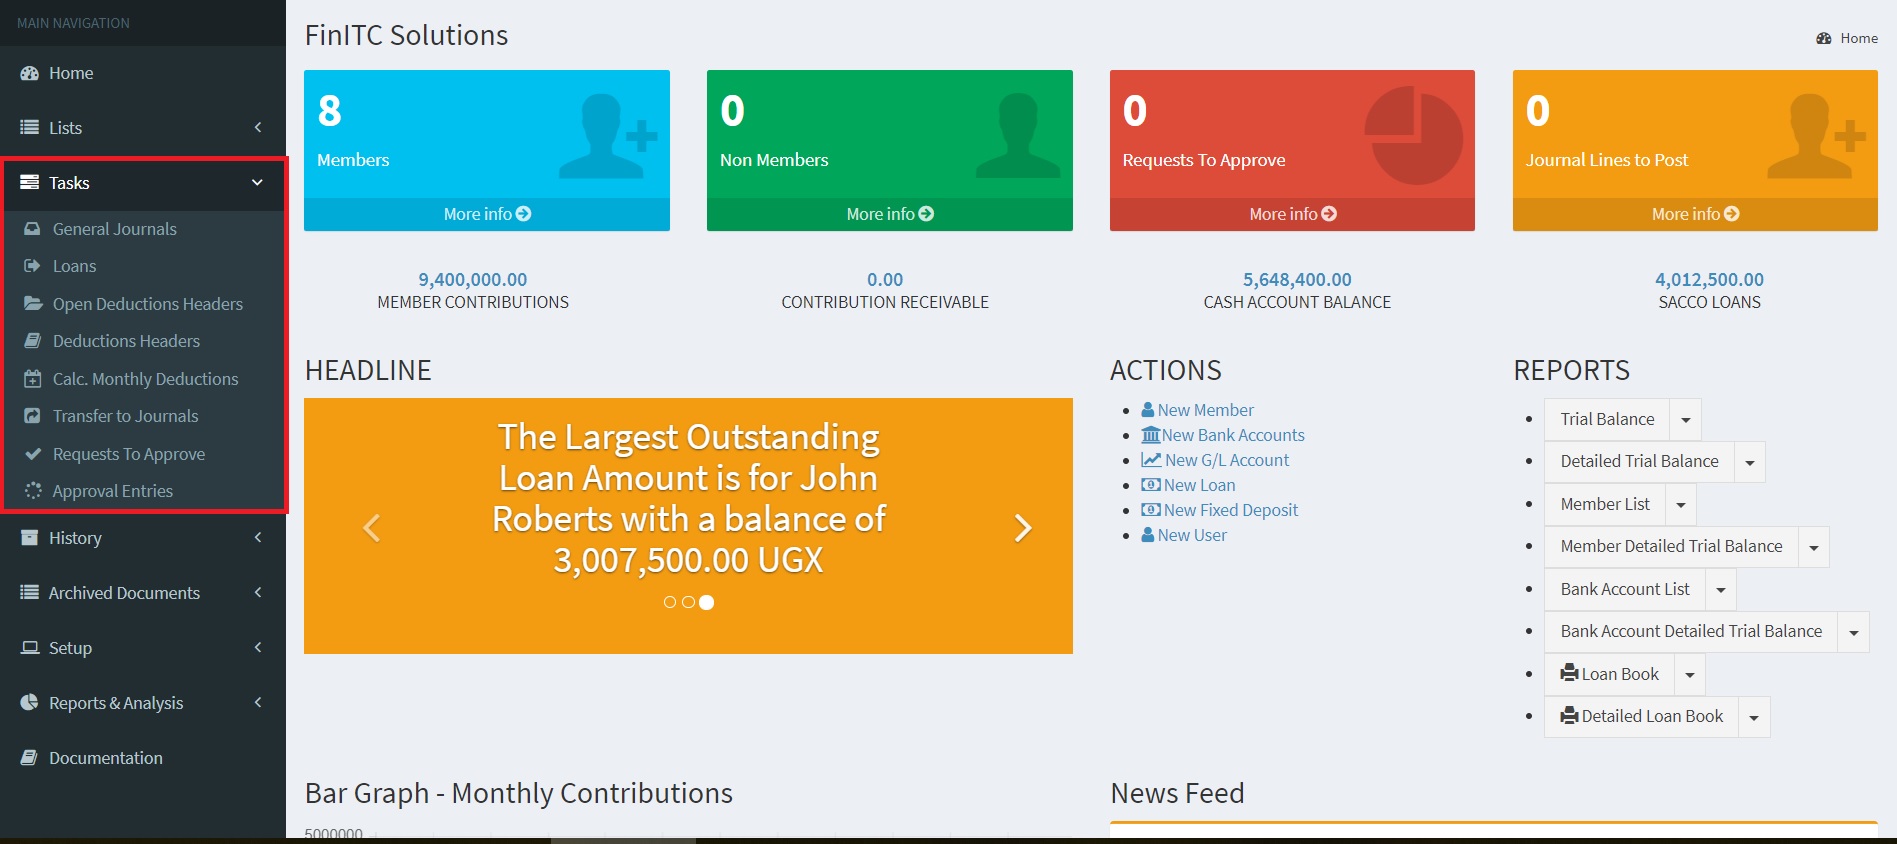
Cues
Cues contains stacks of documents. Click More Info to open the corresponding list.
Quick Accounts
These mainly show balances of the preferred accounts such as Member Contributions, Contribution Receivable, cash account balance and sacco loans.
Tasks
These specify the periodic activities executed every month by the SACCO Accountant or Administrator these include editing journals to post monthly contributions and loan deductions
3.3. Enter and Edit Information
The way to add and edit information in fields depends on the type of field.
Field Types
When you enter information into fields, the system provides the format for the type of information that you enter in the following types of fields:
Date fields - accept only date parameters.
Number fields - accept only numbers.
Text fields - accept information in any format.
Code fields –accept only predefined codes.
FlowFields – display amounts and quantities calculated by the system, for example the Balance field for G/L accounts.
Enter Dates
The system provides flexibility when you enter dates. It displays a calendar from which the user selects the required date.
3.4. Send to Word, Excel and PDF
Any page can be exported to a Word, Excel, or PDF.
For example, to send a member list to Excel, follow these steps:
On the member list, click the Member List drop down
Select Excel from the drop down list.
3.5. Sort Information
With the sorting functionality in System, you can decide the order in which information is displayed. For example, if you have many general ledger entries, you can choose to order them by one of the available fields.
Procedure - Change the Sorting Order
To change the sorting order of a list of general ledger entries, follow these steps:
On the navigation pane, click History.
Click General Ledger Entries.
Click the arrow next to the field to sort by that specific field.
As soon as you have chosen a sorting key, the system sorts the field contents of the selected columns according to the following order:
Numbers only without blank spaces or special characters.
Letters only.
Numbers and letters combined.
When numbers and letters are combined, the field contents are checked character by character from left to right. The sorting priority is as follows:
Blank spaces come before characters.
Letters come before numbers.
Numbers come before special characters.
The sorting priority results in the sorted list shown below
1 : Numbers without blank spaces or special characters come before letters or combinations of numbers and letters, and the system counts in ascending order.
11
12
111
A 1 : This is a combination of letters and numbers. It comes before other such combinations because the blank space between A and 1 comes before anything else.
ABC : Letters come after blank spaces (so ABC comes after A 1 above).
AB1 : Letters come before numbers in letter/number combinations (so ABC comes before AB1).
A1 : Numbers are sorted after letters (so A1 comes after AB).
D S B : D comes after A, and blank spaces come before a character.
D1 : Numbers are sorted after letters (so D1 comes after D S B).
D.S.B. : Special characters come after numbers.
1A : A number at the start of a combination of letters comes next to last in the sorting order.
+A1 : Special characters come last in a sorting.
You must be familiar with sorting rules so that filters can be entered correctly. For example, the filter A100..110 does not result in any data being found because the interval cannot exist. The result of an incorrectly used filter can be incorrect or even no information.
To make sure that numbers are sorted correctly, follow these principles:
Always use a numeric series of a fixed length (100 to 999).
Never use a numeric series such as 1 to 999 in code or text fields.
Never use a numeric series such as 001 to 999 in code or text fields.
The SQL Server Option sorts numbers as if they were text, as illustrated in the following table.
Numeric Sorting
Text Sorting
1
1
2
10
3
100
4
2
10
3
100
4
To avoid the mentioned issues of different sorting logic in MySQL, follow these guidelines:
Use a numeric series that has a fixed length by specifying a numeric series that has an either a predefined number of digits or starts with a number other than zero.
Manually follow the numbering principles and use a fixed number of digits.
3.6. Search Information
In a live system, your database will have thousands of entries. Being able to search through this data or limit the data by filtering it is important so that you can continue with your work.
When you look for a specific record in a list, for example, a staff or member for which you know the name, you can easily use the Search box.
In this example, we look for member Peter Semitego. Follow these steps:
On the navigation pane, click Lists and then click Members.
Go to the search box.
In the Search Box, type Peter. The list will be filtered out by the search name. The search function is not case sensitive and searches all the fields in the record.
3.7. Filters
The search box is also used a quick filter. It limits the number of records displayed on a list page or the number of records.
General Setup
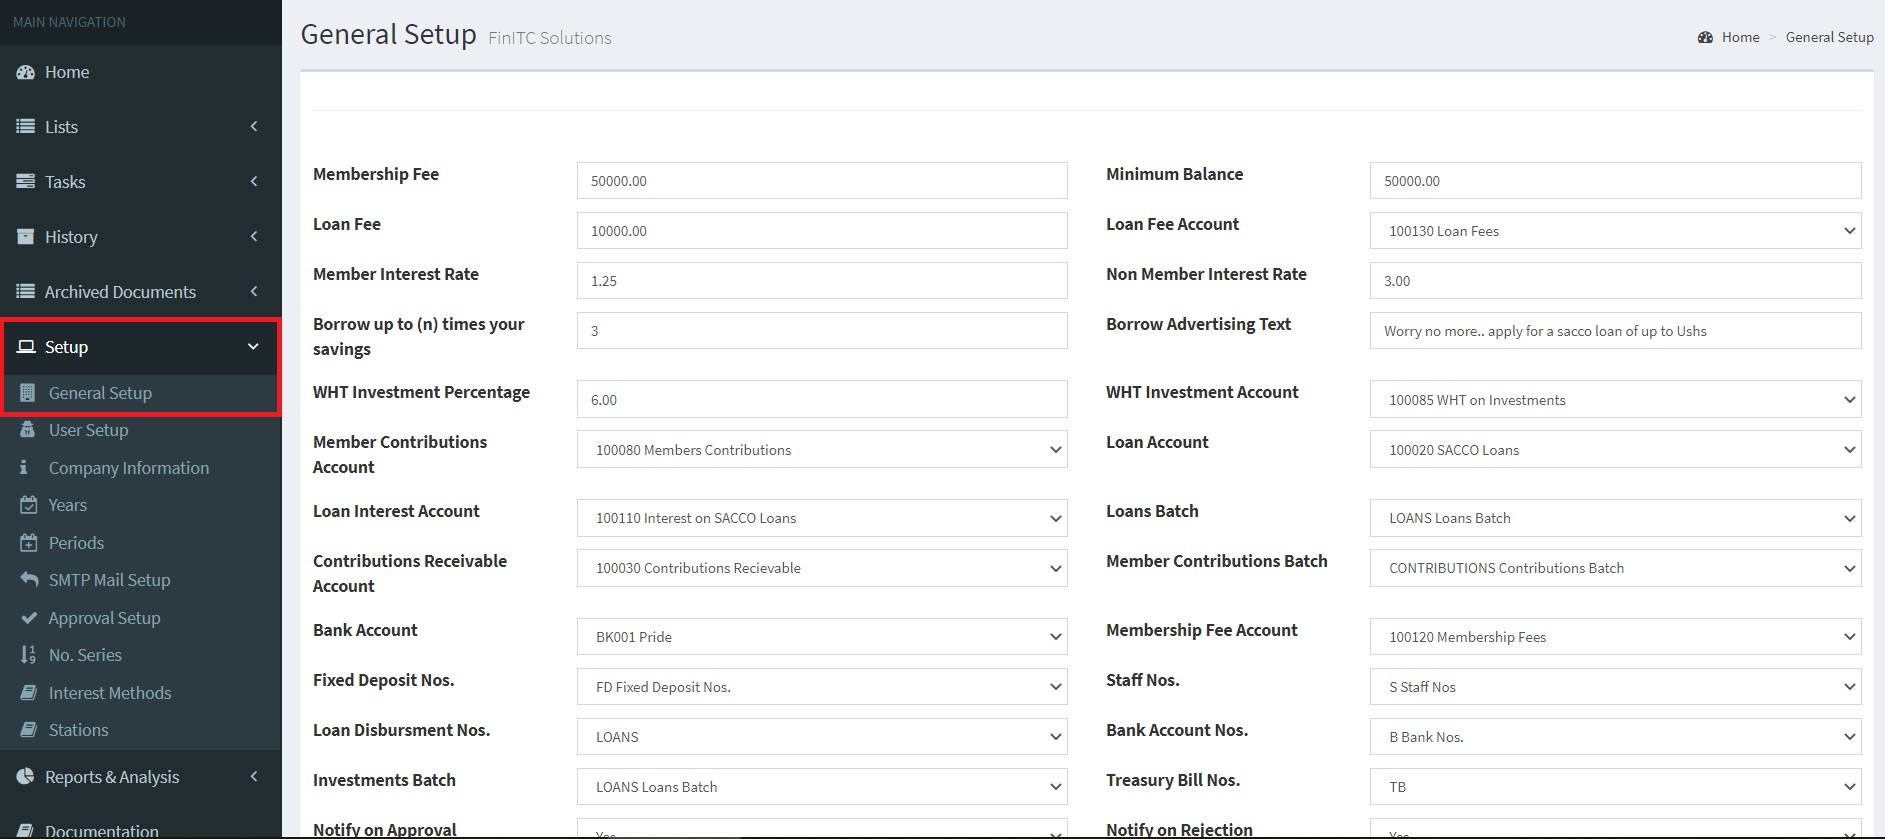
The General Setup window is used to specify a default setting for the general ledger and other application areas.
4.1. General Setup Card
The general setup must be completed for each sacco that is set up in the system.
The General Setup contains the basic setup defaults and includes the following fields:
Membership Fee – Specifies amount that should be paid each time a new member is created in the system.
Minimum Balance – Specifies the amount below which withdraws cannot be permitted.
Member Interest Rate – Specifies the interest rate to be used for SACCO members during loan disbursements.
Non-Member Interest Rate – specifies the interest rate to be used for SACCO non-members during loan disbursements.
Members Contributions Account – Specifies a liability account in the balance sheet that will hold all members’ contributions in the SACCO.
Loan Account – Specifies an asset account that will hold all SACCO loans disbursed to both SACCO members and SACCO non-members.
Loan Interest Account – Specifies an income statement account that will hold interest amount earned from SACCO loans disbursed to members.
Loan Batch – Specifies the batch where all loan disbursements and loan re-payment transactions will be transferred when a loan is paid to a member and period calculation of monthly deductions respectively.
Contributions Receivable Account – Specifies the Asset account in the balance sheet that will hold all monthly contributions, membership fees and loan deduction amounts before being deposited to the SACCO bank account.
Members Contribution Batch – Specifies the batch where all monthly contributions and membership fees will be transferred each time the calculate monthly deduction periodic batch job is executed.
Bank Account – Specifies the SACCO bank account that will be used for SACCO transactions. For example, this account will be credited each time a SACCO loan is disbursed to both a SACCO member and SACCO non-member.
Membership Fee Account – Specifies an income statement account that will hold all membership fee amounts from SACCO members.
Staff Nos. – Specifies the number series that will be used each time a new member is created in the system.
Bank Account Nos. – Specifies the number series that will be used each time a new bank account is created in the system.
Loan Disbursement Nos. – Specifies the number series that will be used each time a loan is disbursed to a SACCO member or SACCO non-member.
4.2. Accounting Periods
With accounting periods, users can create time references in the system.
A fiscal year consists of several accounting periods.
The shortest possible fiscal year consists of one accounting period with one month.
You can use the Years window to do the following:
Open new fiscal years.
Define accounting periods.
The Years window contains the following fields:
Year – Specifies the fiscal year.
Starting Date – Specifies the date that the accounting period will begin. This can, but does not have to be the first day of the month.
End Date – Specifies the date that the accounting period will end. This can, but does not have to be the last day of the month.
Description – Specifies the name of the accounting period. As a default, the program will enter the year as the description.
Closed – Specifies if the accounting period belongs to a closed year. By closing a fiscal year, all periods in the year will be closed.
Setting up an Accounting period
To create accounting periods, follow these steps.
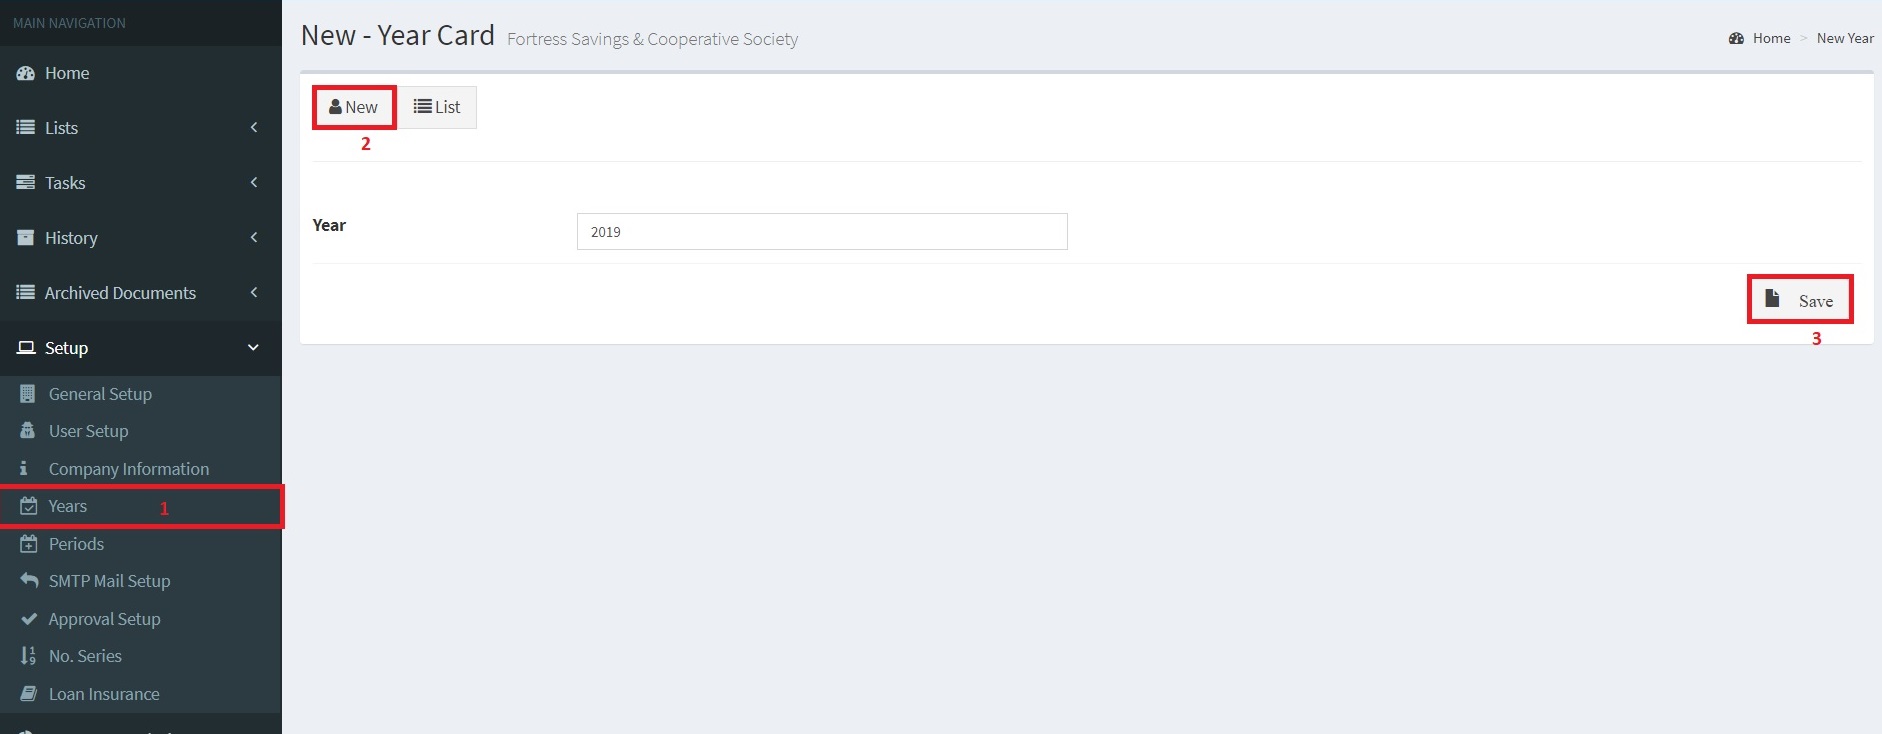
On the Navigation Pane, Click Setup > Years.
Click New
Enter the Year for example 2019 and click Save.
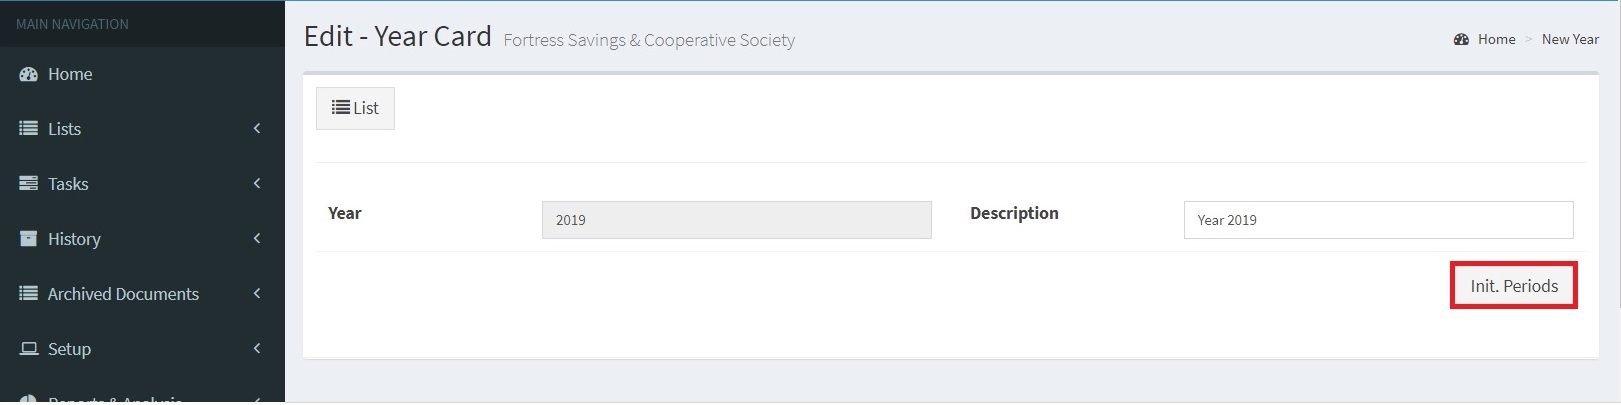
Edit the Year.
Click the Pencil icon to edit the year.
Click Init. Periods to initialize the accounting periods. This will create the accounting periods
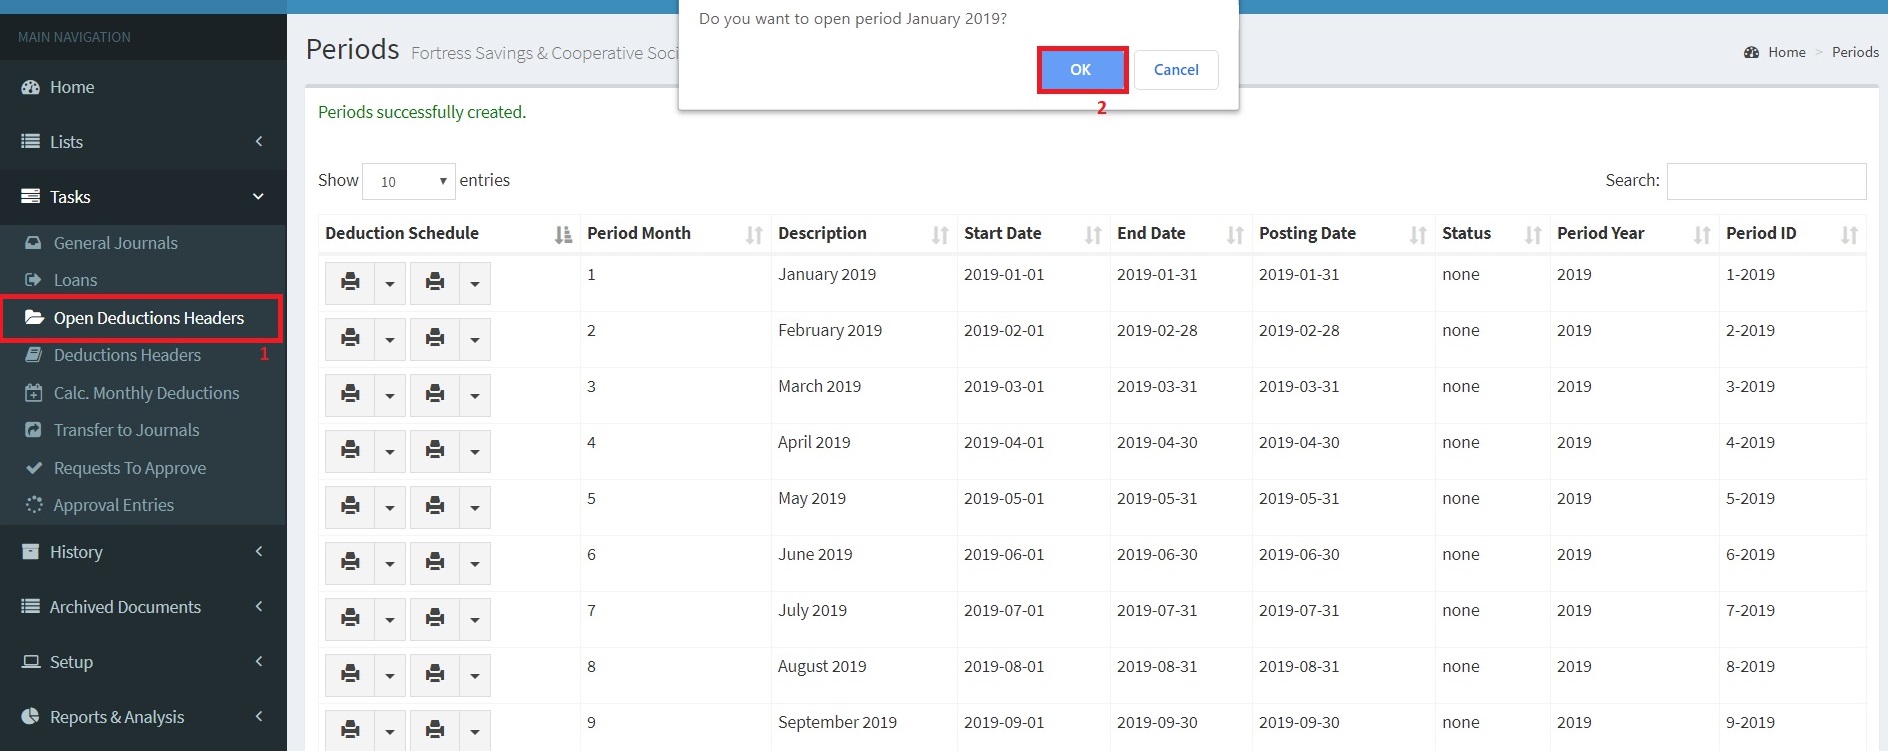
Open Period
Before you start processing Sacco transactions, there must be an open period. The Sacco System supports a sacco period of one month.
To Open a Period, Follow the steps below
Under Tasks > Click Open Deduction Headers
Click Ok
General Ledger
Two main components of the General Ledger application area are the Chart of Accounts General Journals.
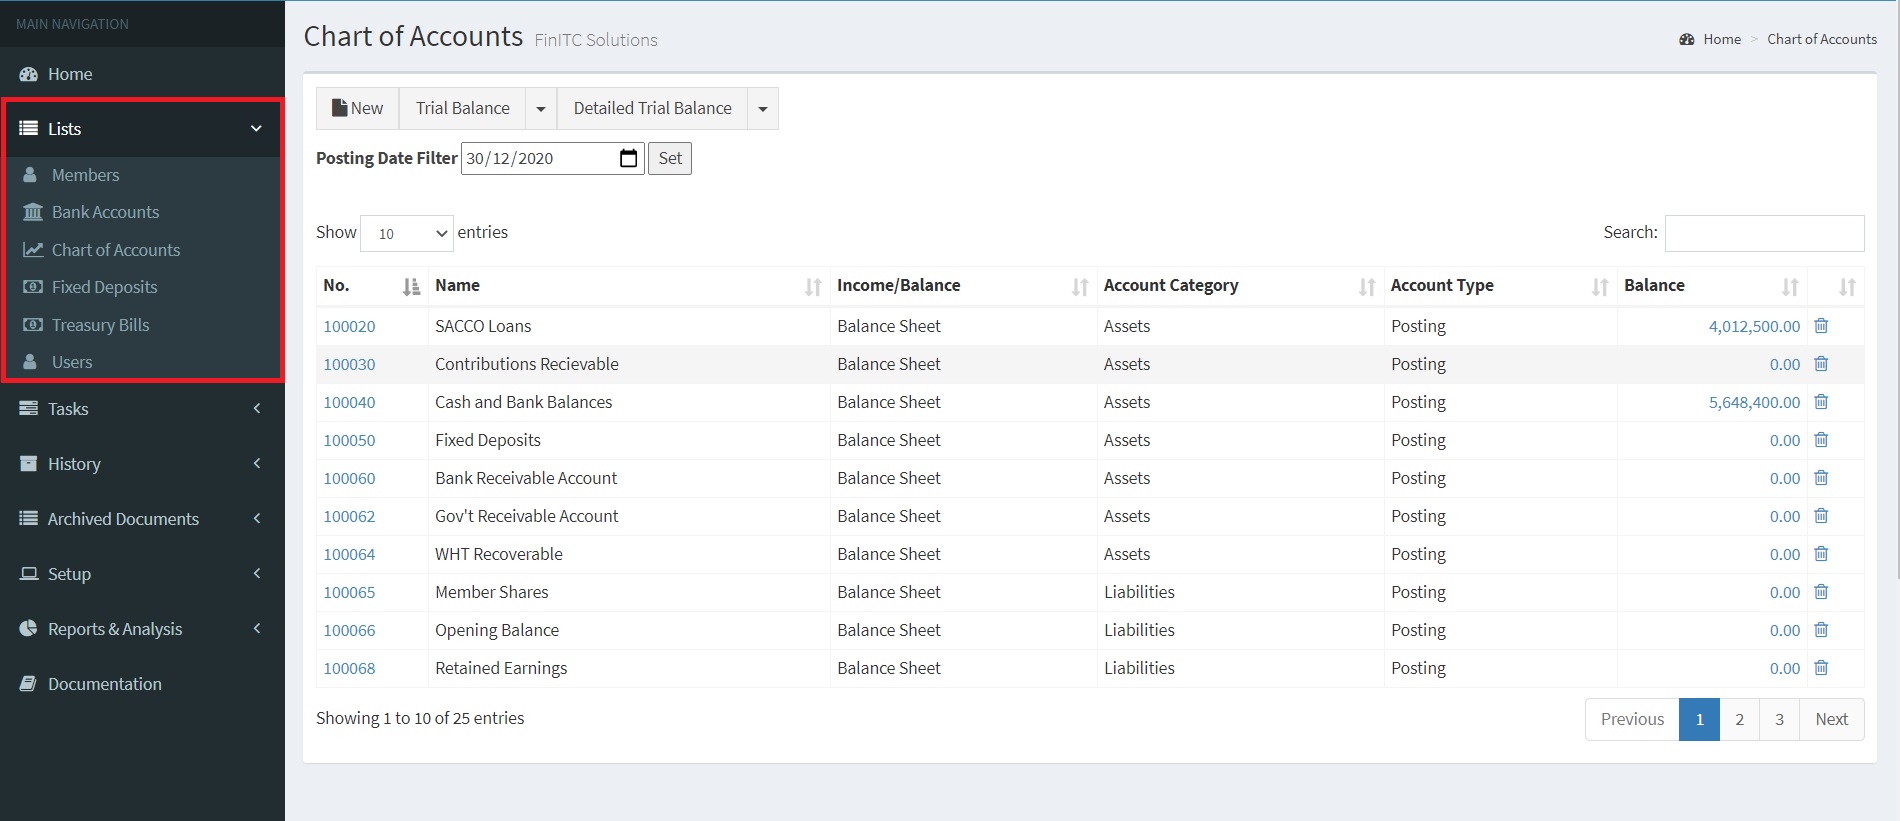
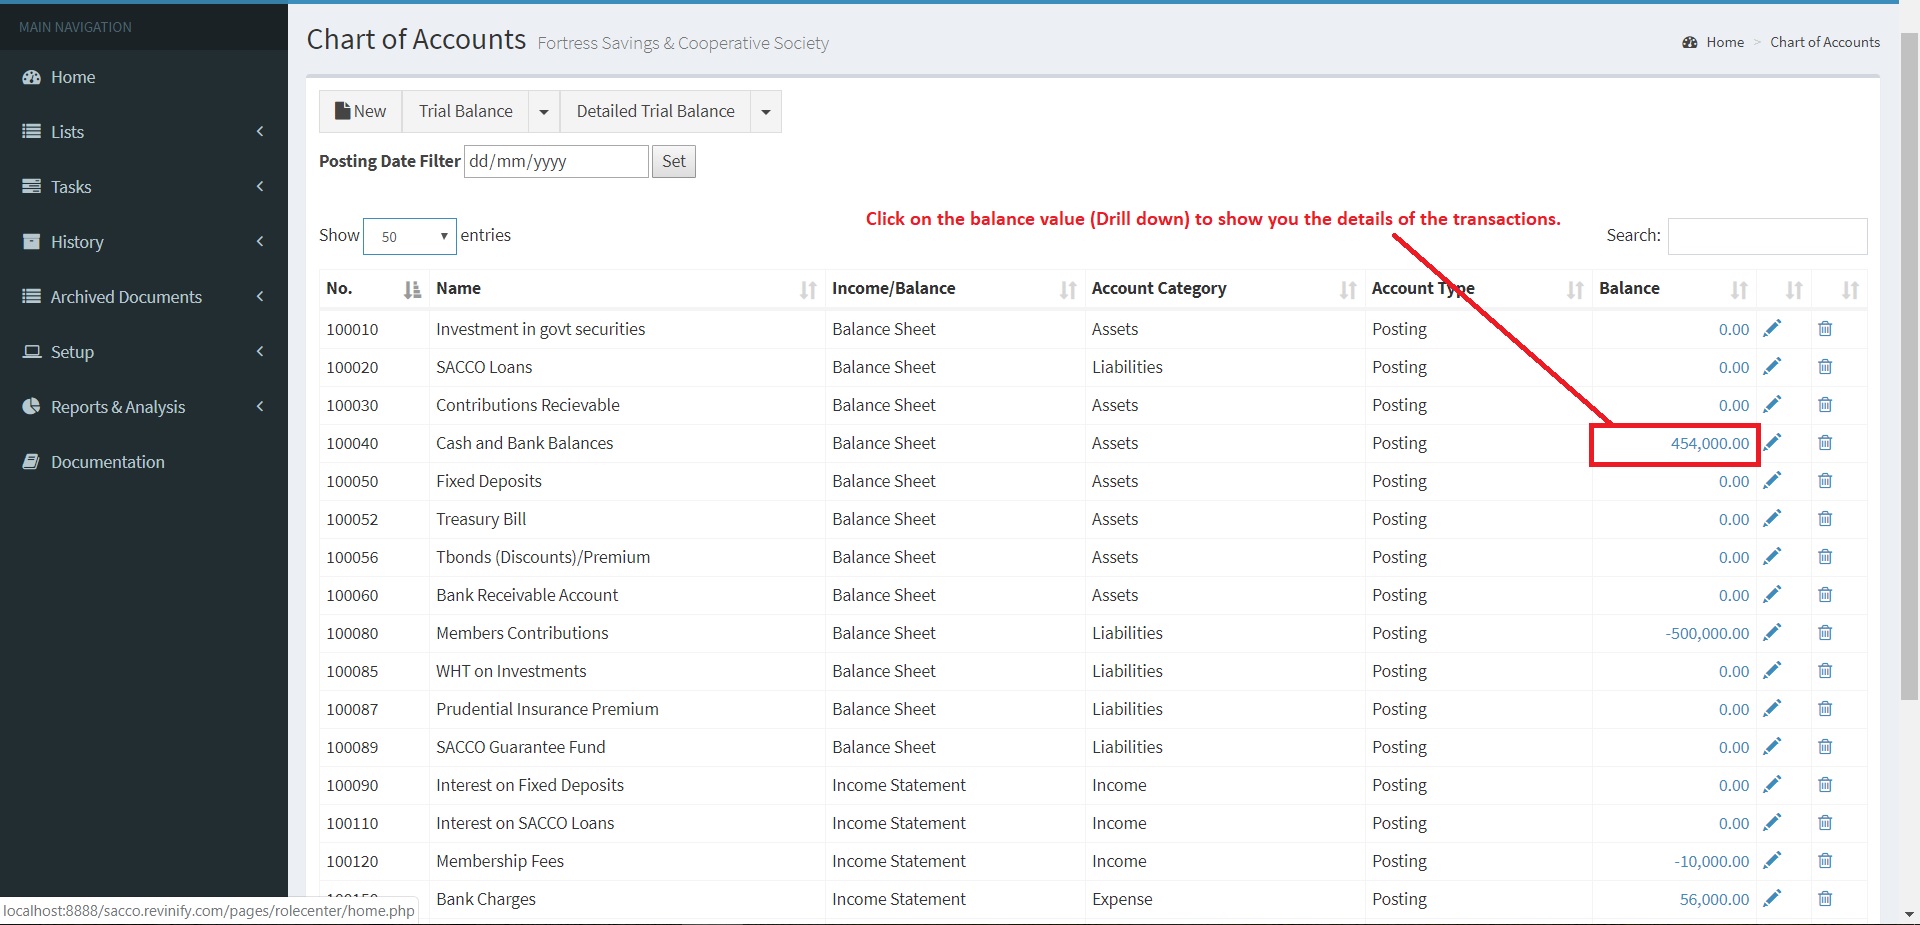
5.1. Chart of Accounts
The Chart of Accounts provides quick access to G/L Accounts and balances. This is the heart of the Sacco Management System. Every process executed in the Sacco Management System ends up in the Chart of Accounts
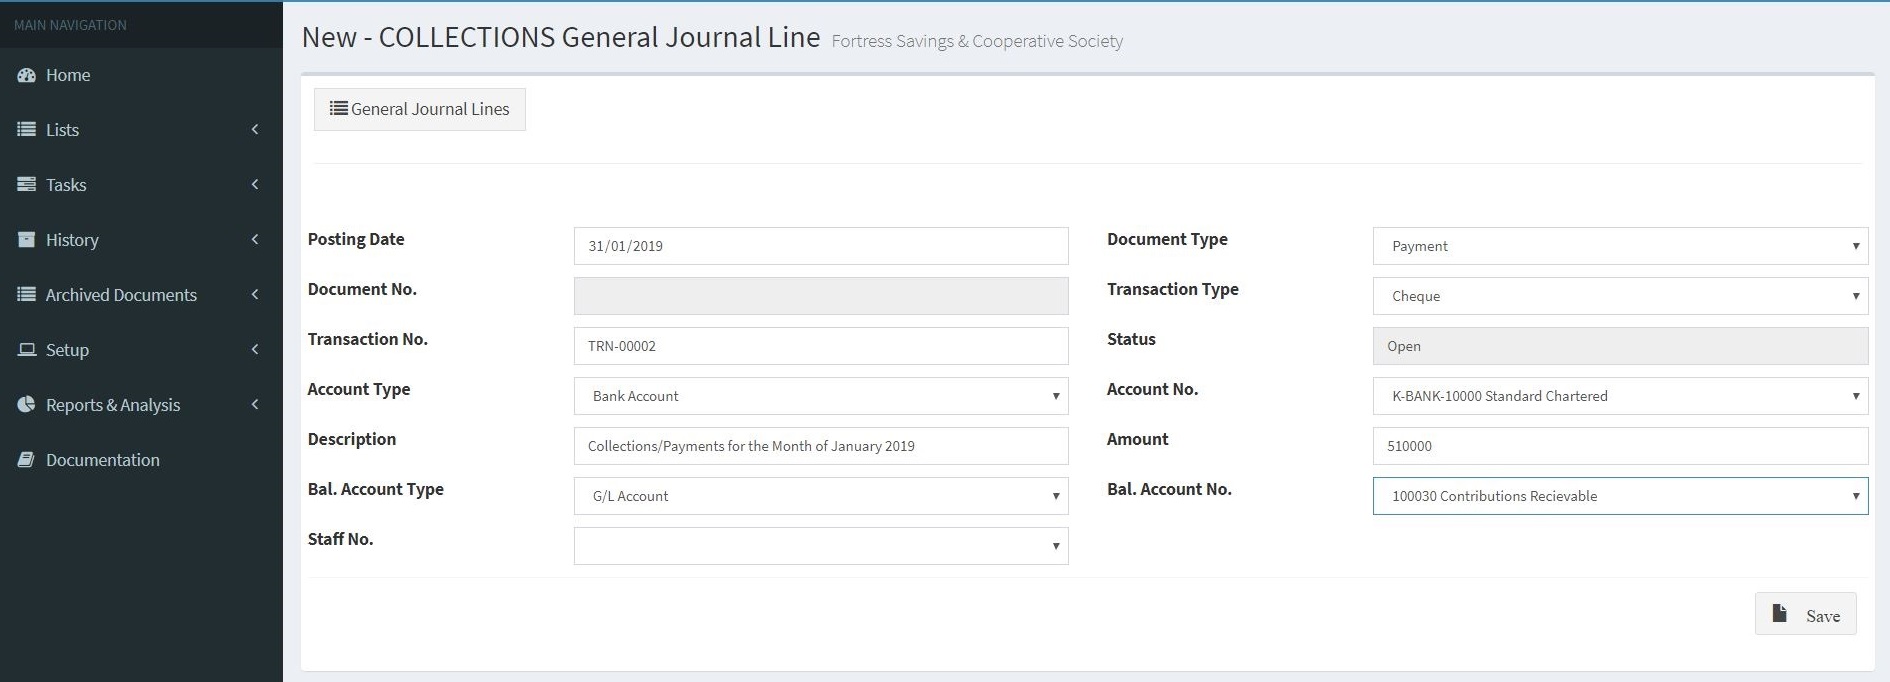
5.2. Creating and Posting Journal Entries
Users can create and post journal entries. To enter lines in a general journal, follow the steps below.
In the navigation pane, click Tasks and then click General Journals.
When multiple General Journal Batches are created, the General Journal Batches List page will open. Highlight the line that you want for the General Journal Batch and then click the Name to open the selected batch.
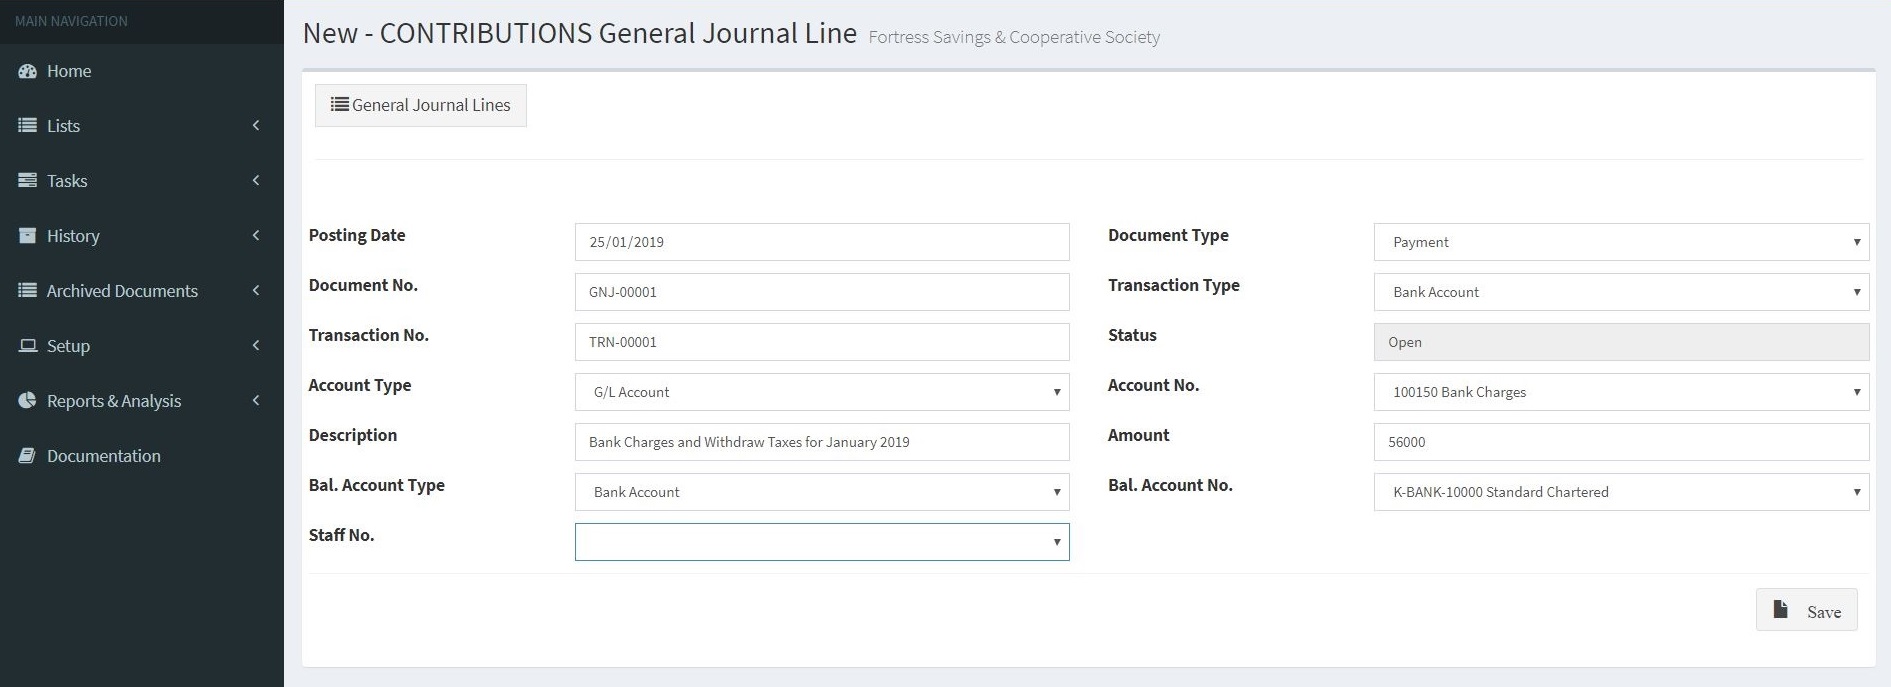
Click New to enter a new Journal Line
In the Posting Date field, enter the date of this entry.
In the Document Type field, click the drop-down list and select the relevant document type for this entry.
In the Transaction Type field, click the drop-down list and select the relevant transaction type for this entry.
In the Transaction No. field, enter the Cheque No. or Mobile Money Reference No., or basing on the selected transaction type.
In the Document No. field, leave the defaulted number, provided by the number series that is set up on the general journal batch, or assign a unique number if this field is editable.
In the Account Type and Account No. fields, click the drop-down list and select the account this entry will be posted to. Typically, for a general journal entry, general ledger accounts are used.
In the Description field, enter the narration of the transaction.
In the Amount field, enter the amount for the entry.
In the Bal. Account Type and Bal. Account No. fields, click the drop-down list to select the balancing account for this entry.These fields are automatically populated when the controlling general journal batch is set up with a default balancing account type and number.
Click the Save button to add the entry to the journal.
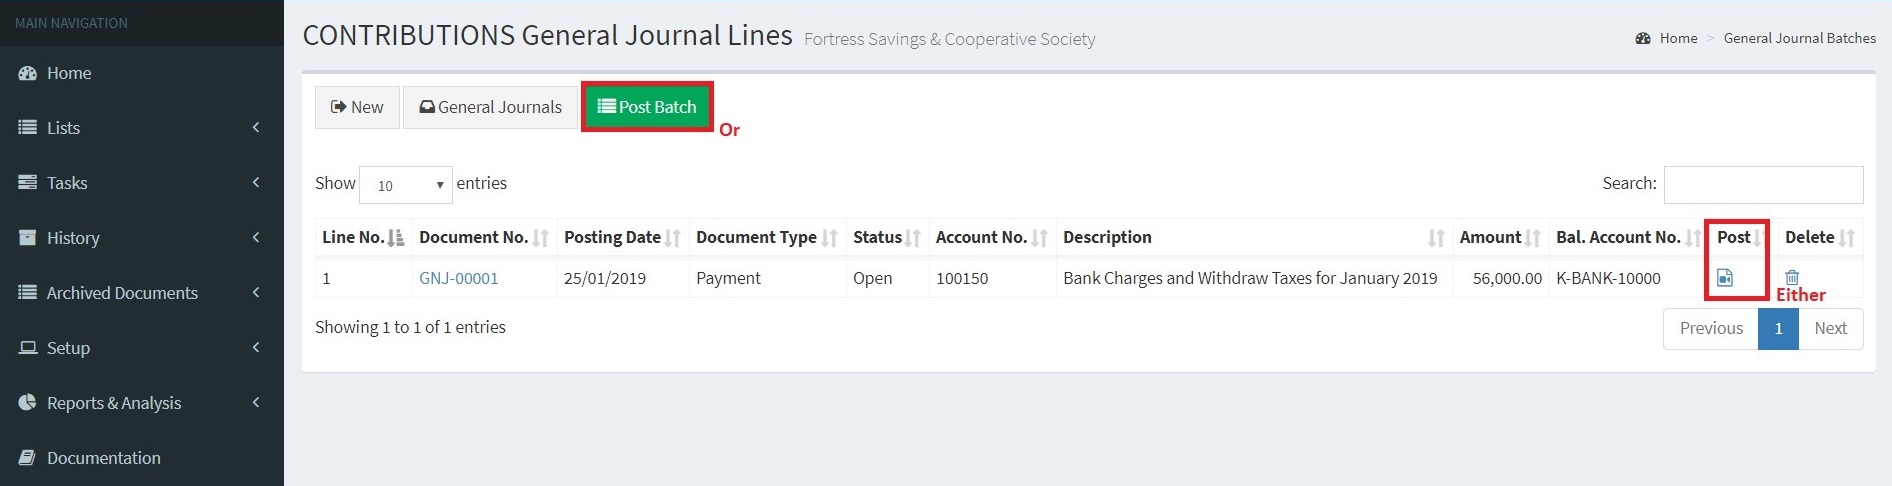
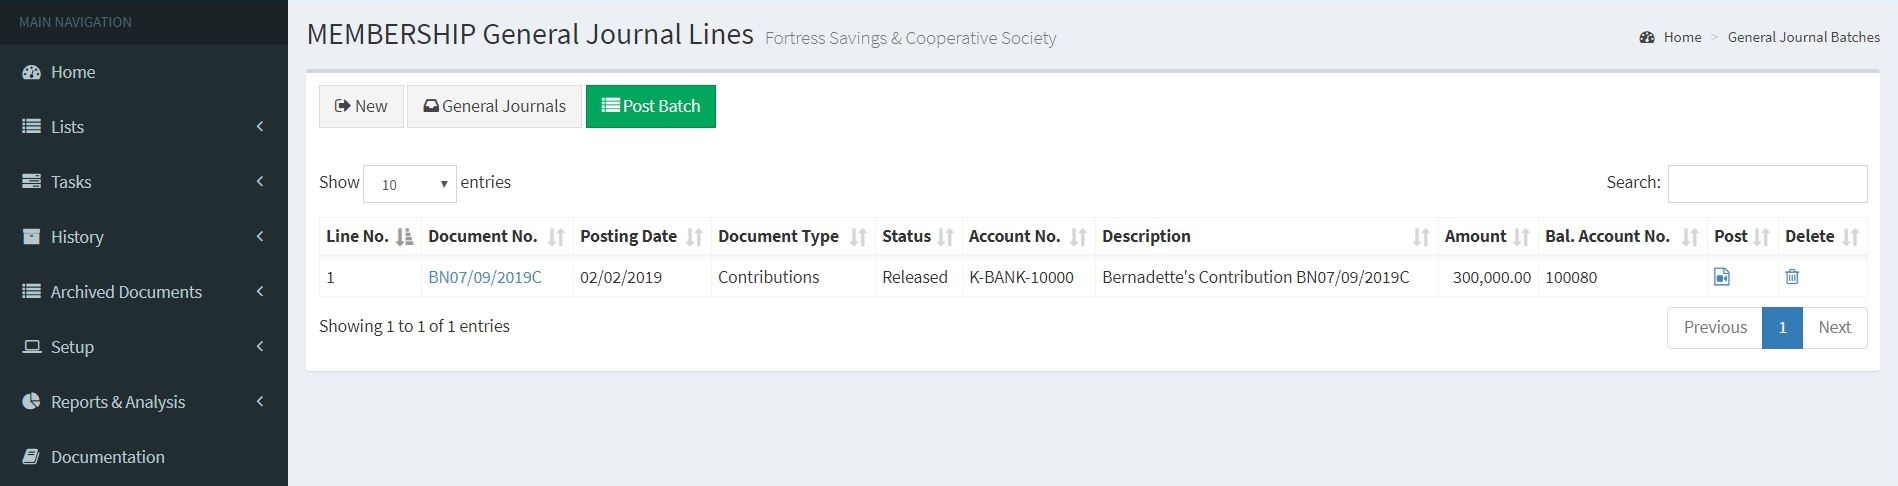
5.3. Post General Journal Lines
To post the general journal line, follow the steps below;
Scroll to the right of the Journal line and click the icon below Post Caption.
Click Yes to post the journal line.
In order to post multiple journal lines, click the Post Batch and Click Yes.
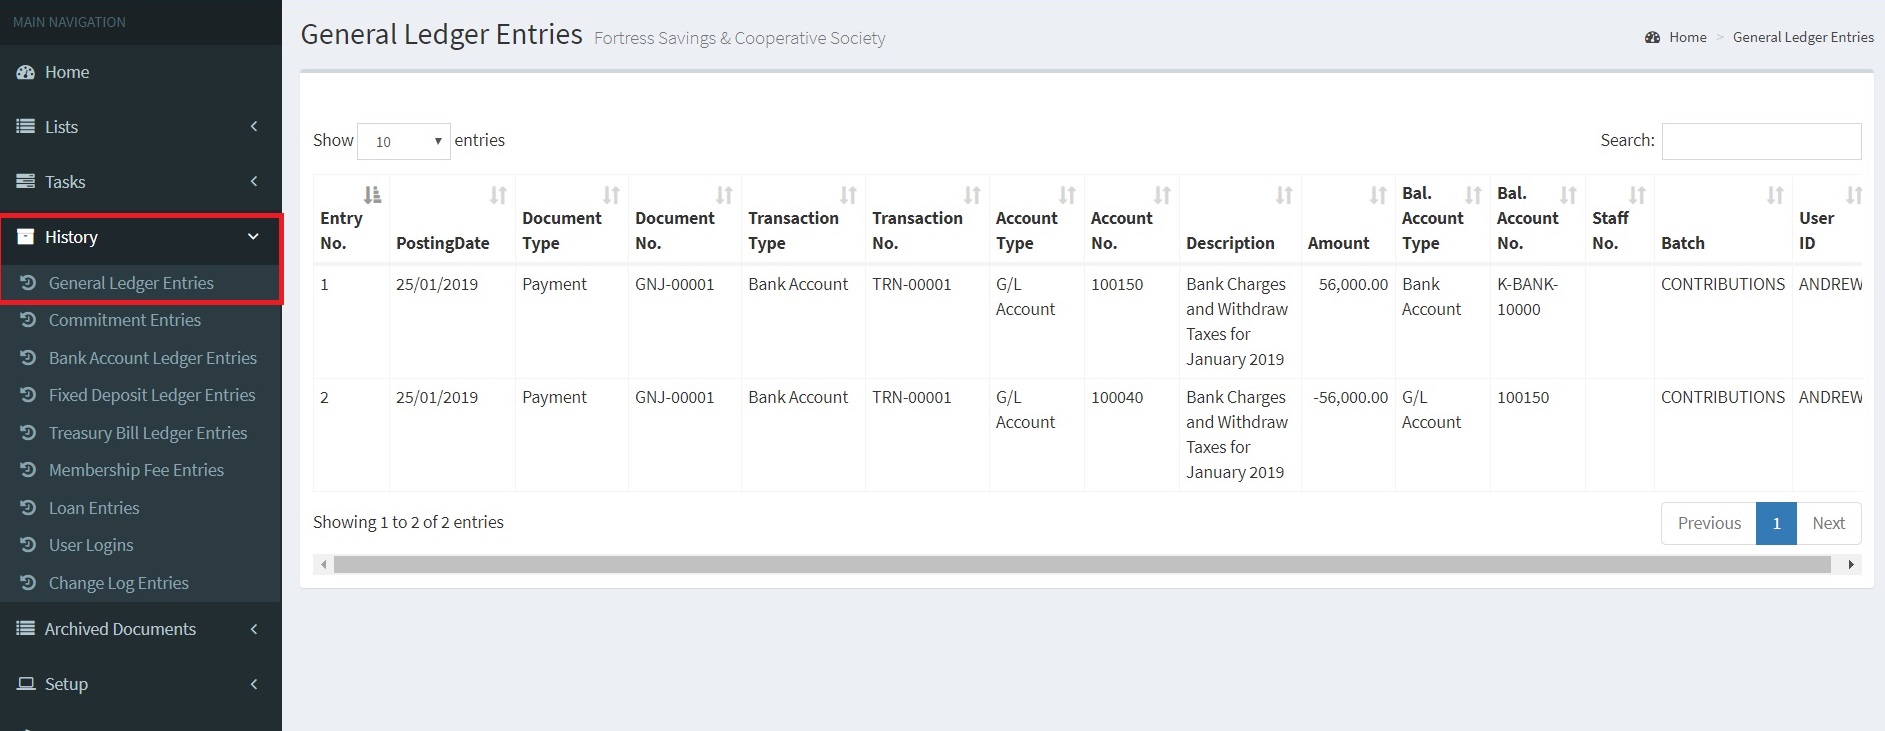
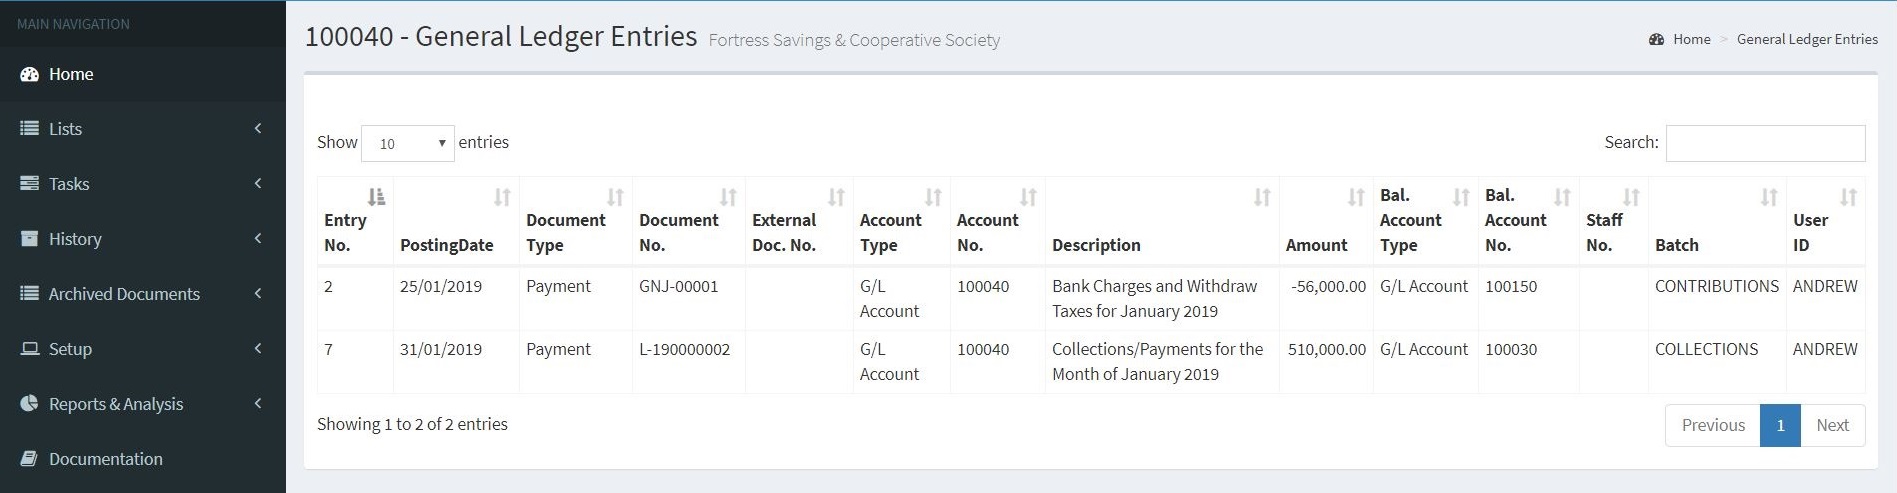
5.4. Reviewing Posted Entries
On the navigation pane, click History > General Ledger Entries.
Click the Entry No. field to sort by either ascending or descending.
Review the general ledger entries.
Two entries are created to complete the double entry.
Receivables
Receivables are claims for payment held by the Sacco for services rendered to the sacco members such as loans and member registration fees that sacco members have ordered but not paid for.
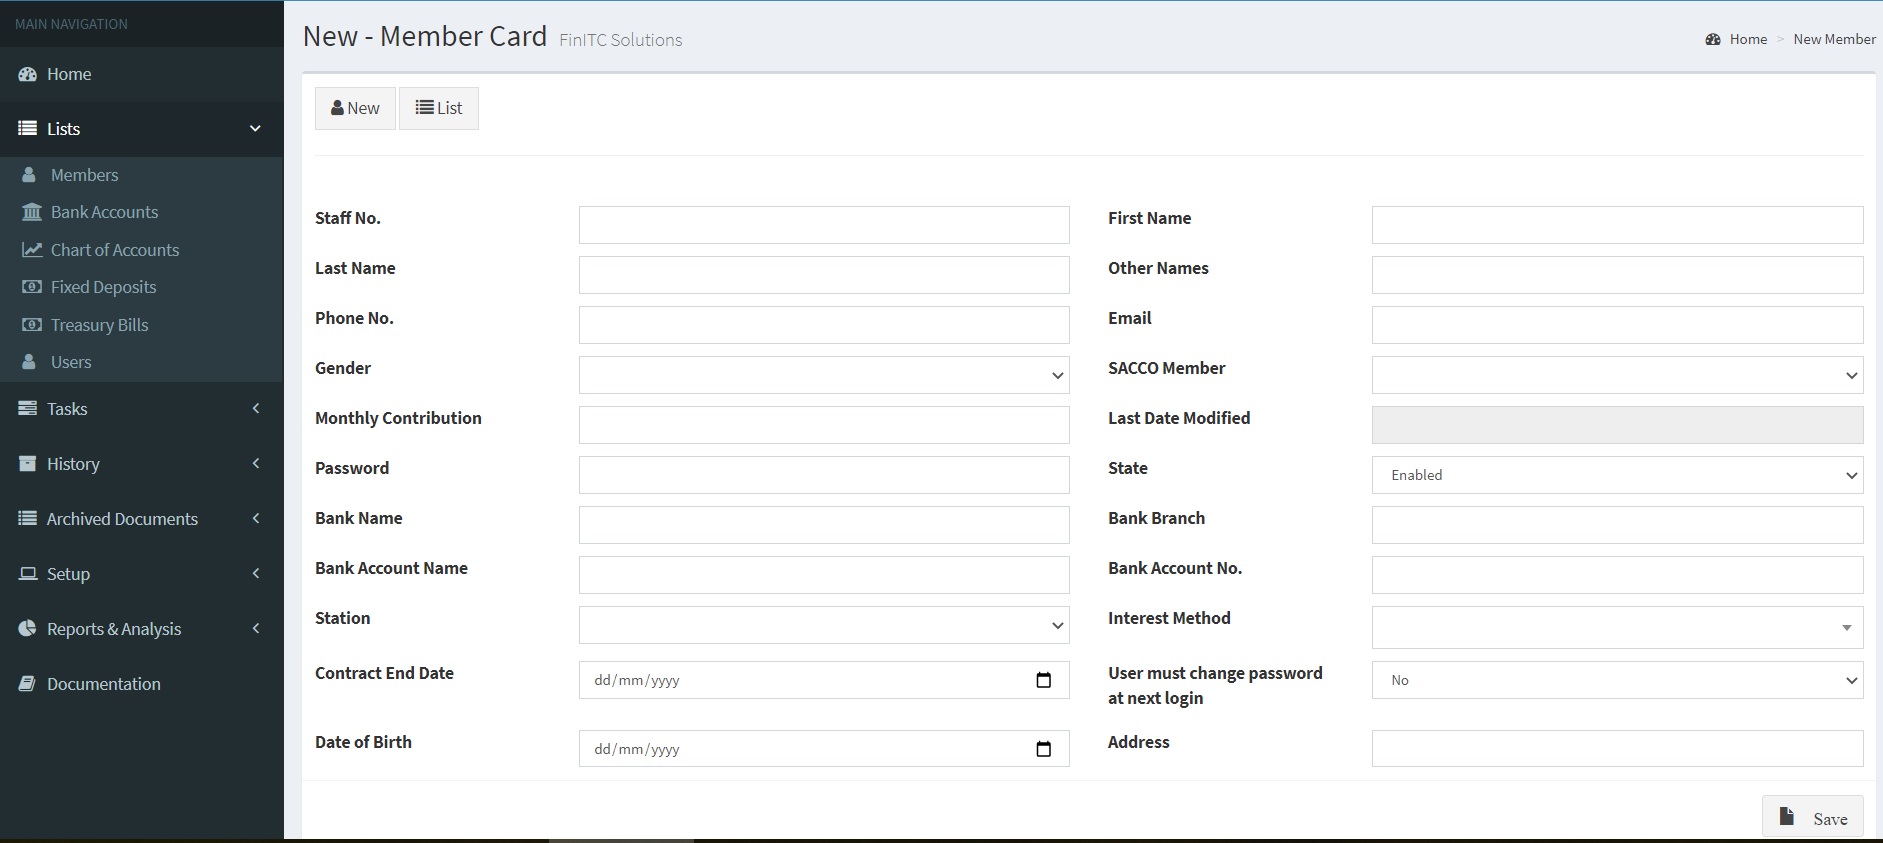
6.1. Create a Sacco Member
Scenario: As the accountant manager at Fortress Sacco, you are responsible for setting up new members. A new member, Bernadette Nantume, has contacted your SACCO and requested to start saving with your sacco.
You have agreed on the SACCO policies and you must create a card for the member in the database so that receiving of membership fees can start.
To fill in the minimum required fields, follow these steps:
Demonstration Steps
Create the new member in the database.
On the navigation pane, click Lists and then click Members.
Click New to open a new Staff/Member Card
In the Staff No. field, type MEMB-0001
In the First Name field, type "Bernadette".
In the Last Name field, type "Nantume".
In the Other Names field, type "Nankintu"
In the Phone No. field, type "0784321490".
In the Email field, type "bnantume@gmail.com".
In the Gender field, choose "Female".
In the SACCO Member field, type "Yes".
In the Monthly Contribution field, type 500000
In the Password field, type "Bernadette*123".
Enter the Bank Details in the respective fields
Click Save to insert the record to the database.
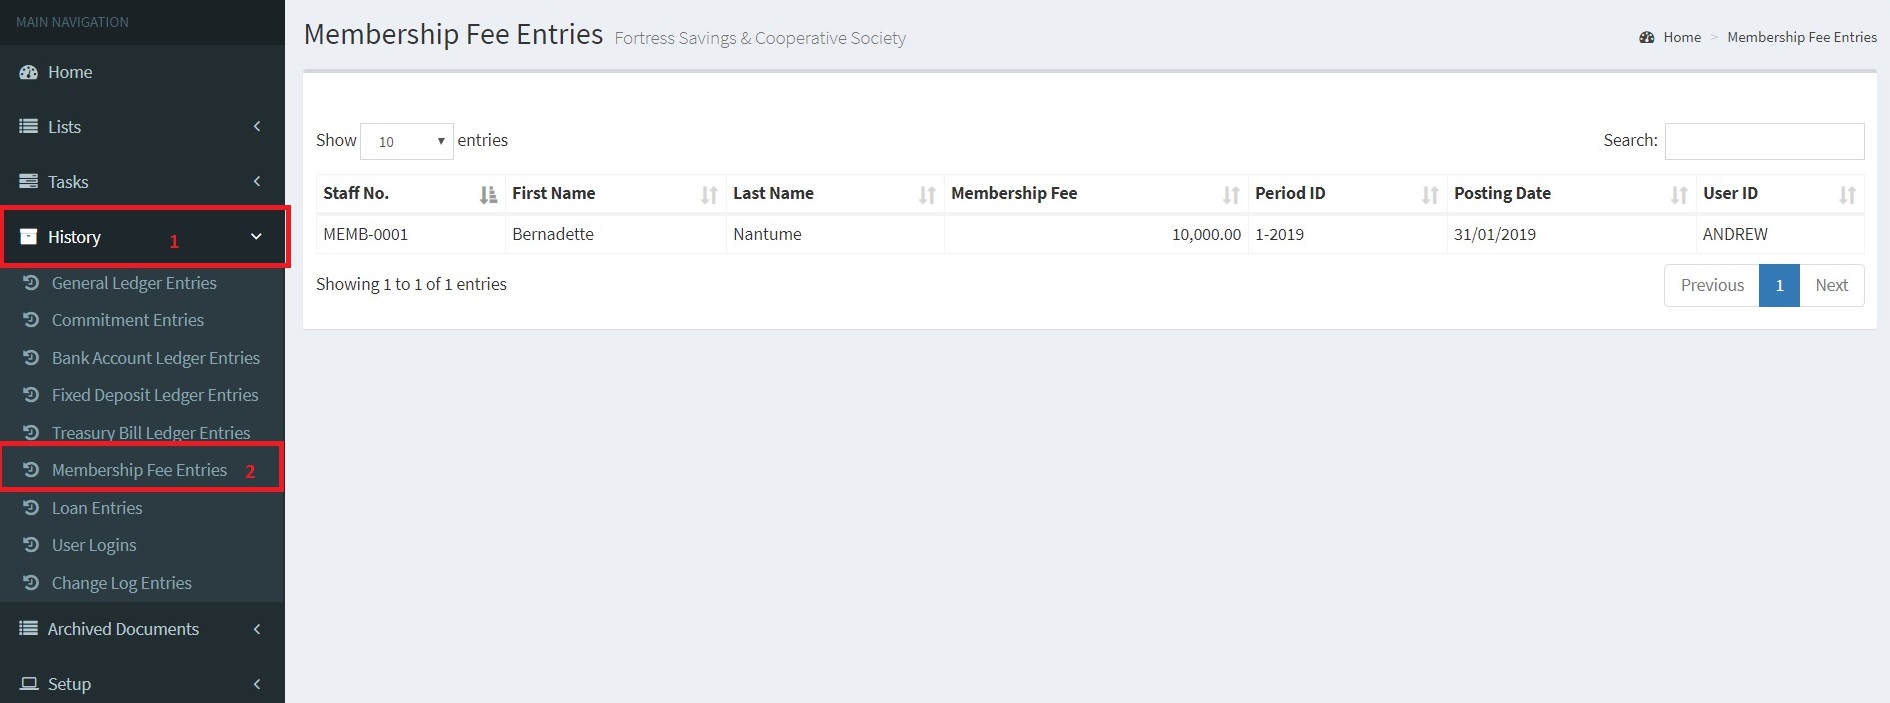
6.2. Membership Fee Entry
Each time a new sacco member is created, the system creates a membership fee entry that will be used during the monthly periodic calculation.
The membership entry can be accessed by following the steps below;
On the Navigation Pane, Click History and then select Membership Fee Entries
6.3. Monthly Deductions
Whether simple or complex calculation, it is imperative to have a working area for such calculation to be successful. The system uses deduction headers to hold calculation of interest rates, membership fees, monthly contributions and loan repayments.
There are mainly two ways of creating deduction headers
By using the “Open Deduction Header”, batch job.
Through creation of new members/staff.
Calculate Monthly Deductions
Every month, saccos need to ascertain their performance. This can be achieved through posting monthly transactions and analyzing reports thereafter.
The system provides a faster way of calculating SACCO related transactions such as membership fee registrations, loan deductions and monthly contributions. This is achieved by using the “Calc. Monthly Deduction” batch job.
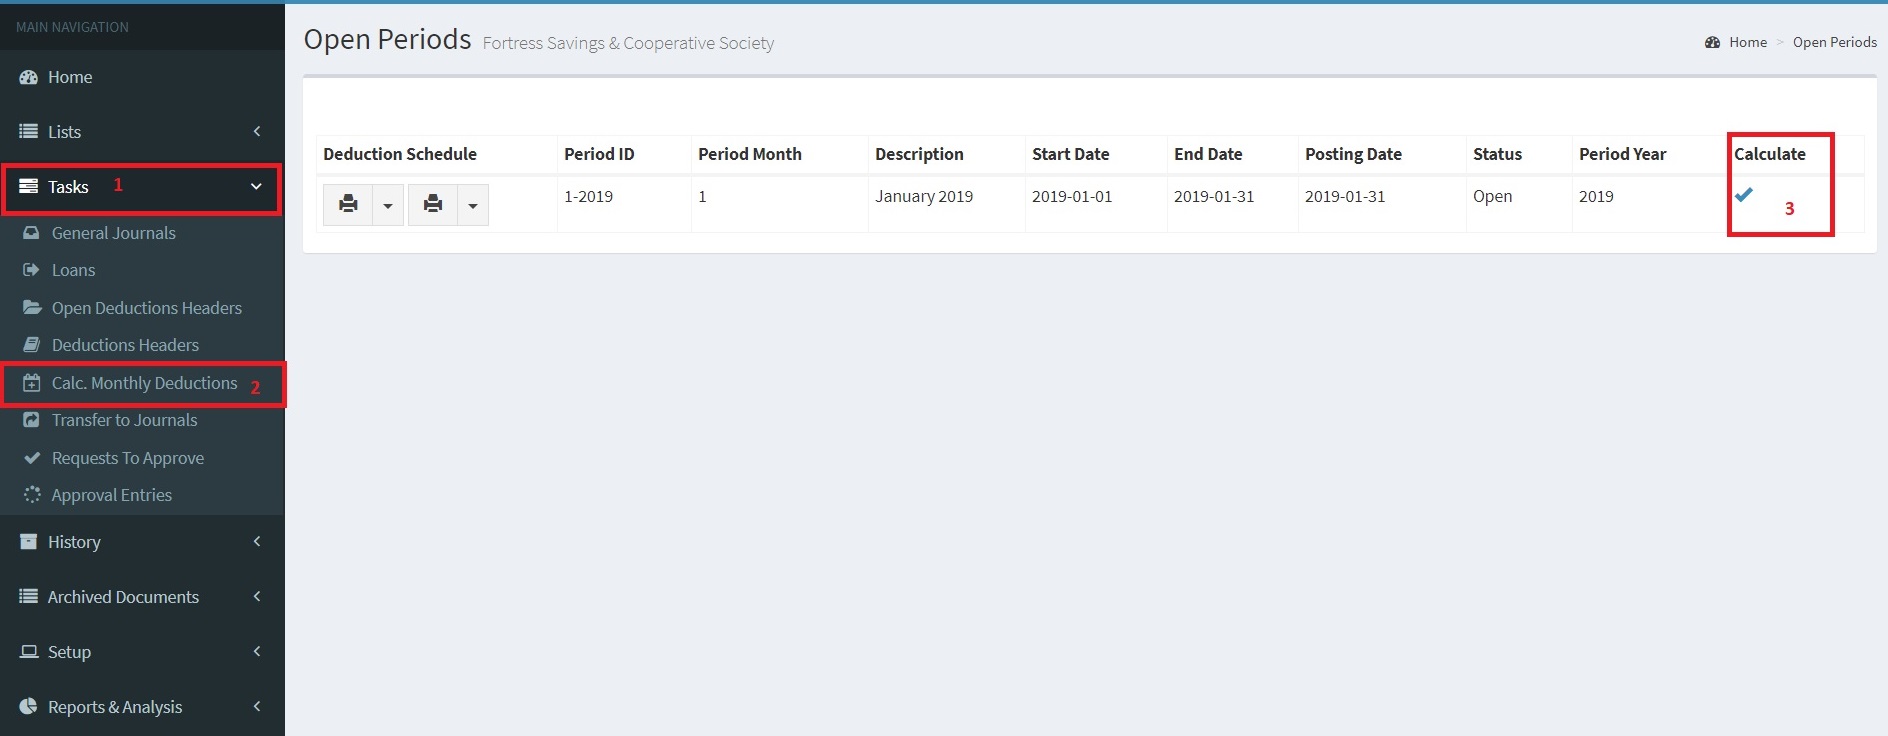
To perform the monthly deductions, follow the steps below;
On the Navigation Pane, Click
Under Tasks, click “Calc. Monthly Deductions”
Select the period you want to calculate and click the Calculate icon on the extreme right.
The Deduction headers will be updated with the required amounts.
New members will have both the Membership Fee and the Monthly Contribution amounts updated whereas old members will have monthly contributions and loan deductions if any.
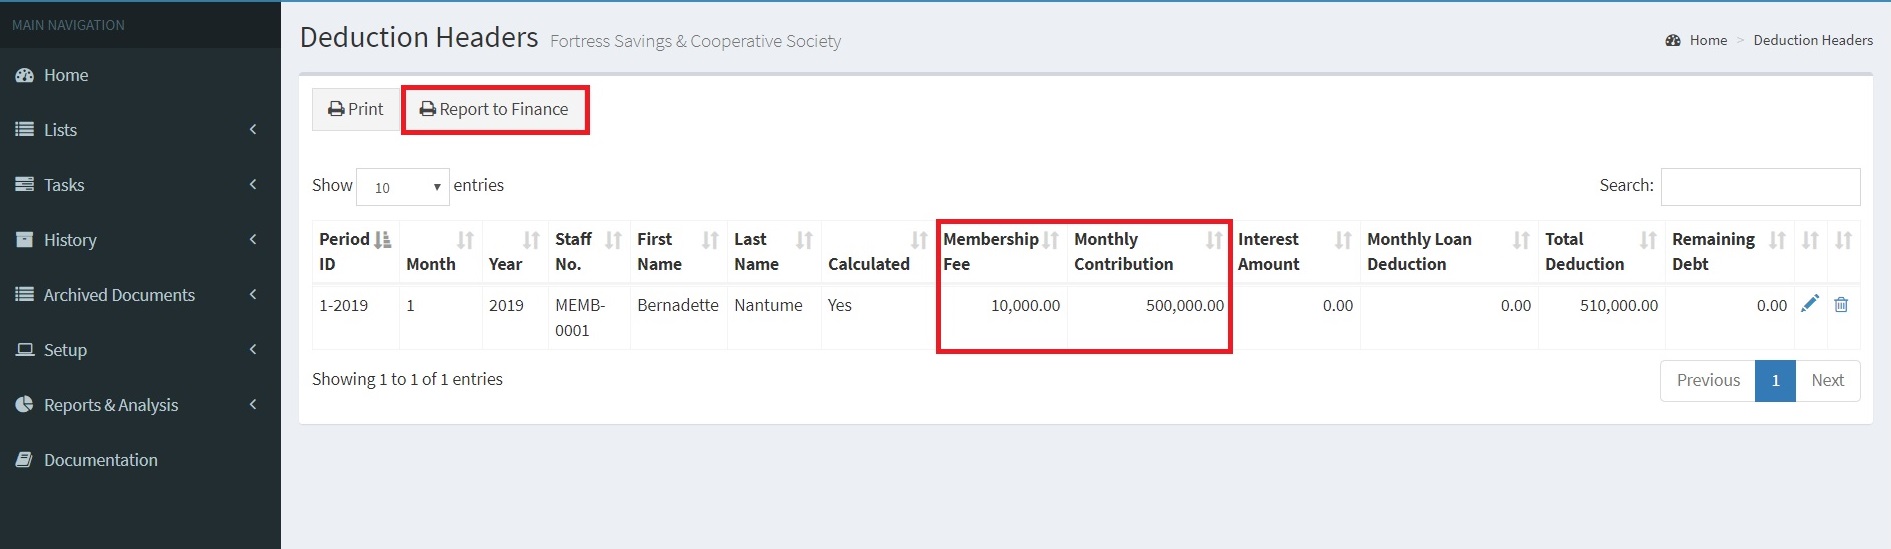
Once the monthly contributions have been computed, a report showing the total amount receivable will be generated.
The SACCO Management system provides various ways of collecting receivables which include the following;
Organisation Payroll - The "Report to Finance" can be sent to the Financial Department resposible for processing of the payroll so that the deductions can be made from the sacco members' monthly pay. This is best applicable when all Sacco members belong to the same orgarnization.
Application Programing Interface - The "Report to Finance" is used as a basis of collecting money using the mobile money collection Application Programming Interfaces. The Sacco Management System Integrates with a number of payment gateways such as Beyonic, Yopay among others. The payment gateway to be used is determined by the Sacco administraion.
Standing Orders - Sacco Members can instruct a bank in which they hold accounts to make regular fixed payments to the Sacco. Until the payment hits the sacco account, the sacco registers such amounts as receivables.
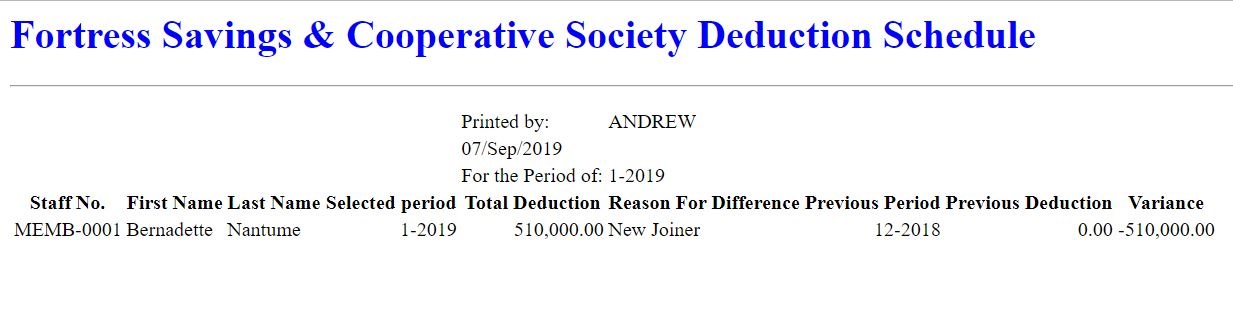
Deduction Schedule Report
Note that the the total Deduction is 510,000. This is because the Sacco Member pays a monthly contribution of 500,000 as specified on the member card.
Given that the member was created in the month of January 2019, She will also have to pay a membership fee of 10,000. This membership fee is specified in the General Setup. Please refer to the General Setup for more details.
6.4. Transfer to Journals
Once monthly calculations have been completed, reminders are sent to members about their monthly contributions or loan deductions. The Sacco has to acknowledge the receivables. This is done by transferring the computed deduction to the journals for posting by clicking the "Transfer to Journals" button.
Note: Once deduction headers are transferred to the journals, they will no longer be available for editing.
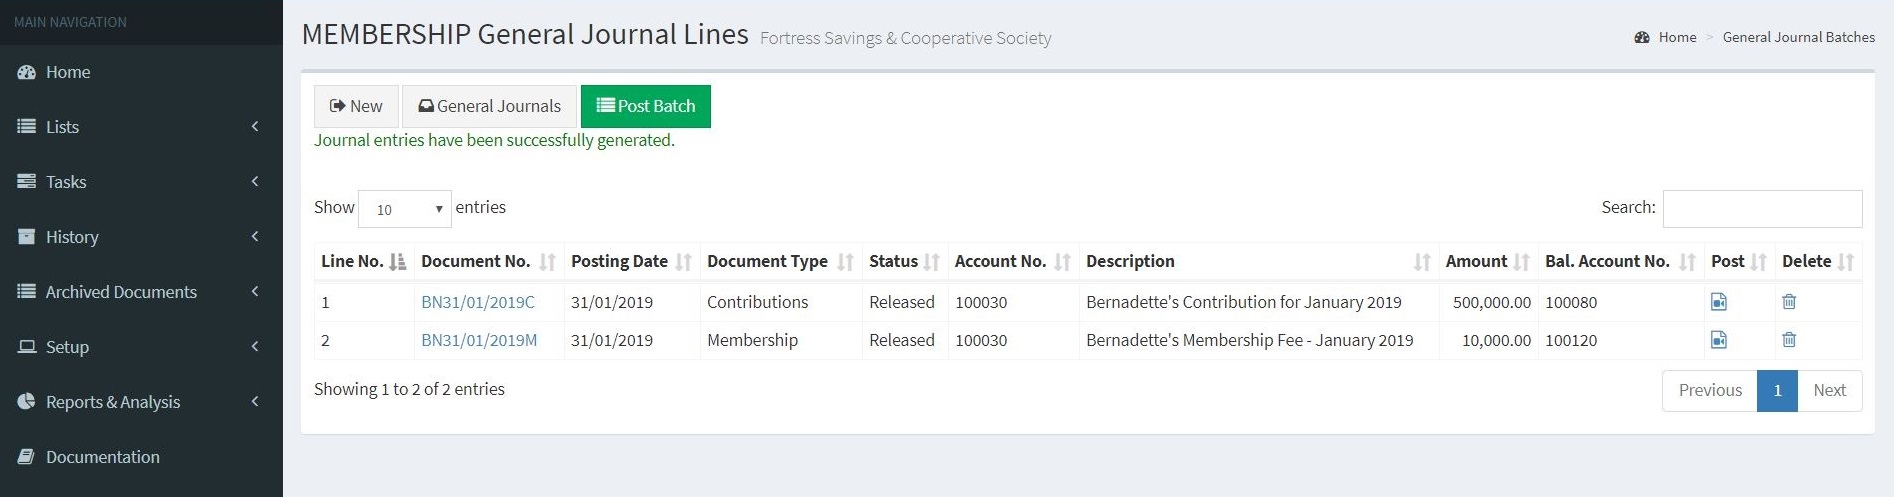
General journal lines are created in the contributions and loans batches for monthly contributions and loan disbursements or repayments respectively. These batches are specified in the general setup.
When the deduction headers are transferred to the journals for posting, the system automatically performs the following double entry.
Monthly contributions
Debit: Contributions Receivable (Asset Account) - holds the claims for payment
Credit: Members Contributions (Liability Account) - holds the obligations by the sacco for keeping it's members contributions.
Membership fees
Debit: Contributions Receivable (Asset Account) - holds the claims for payment
Credit: Membership Fee Account (Revenue Account) - holds the money earned from member registrations
The figure below shows the effect after posting
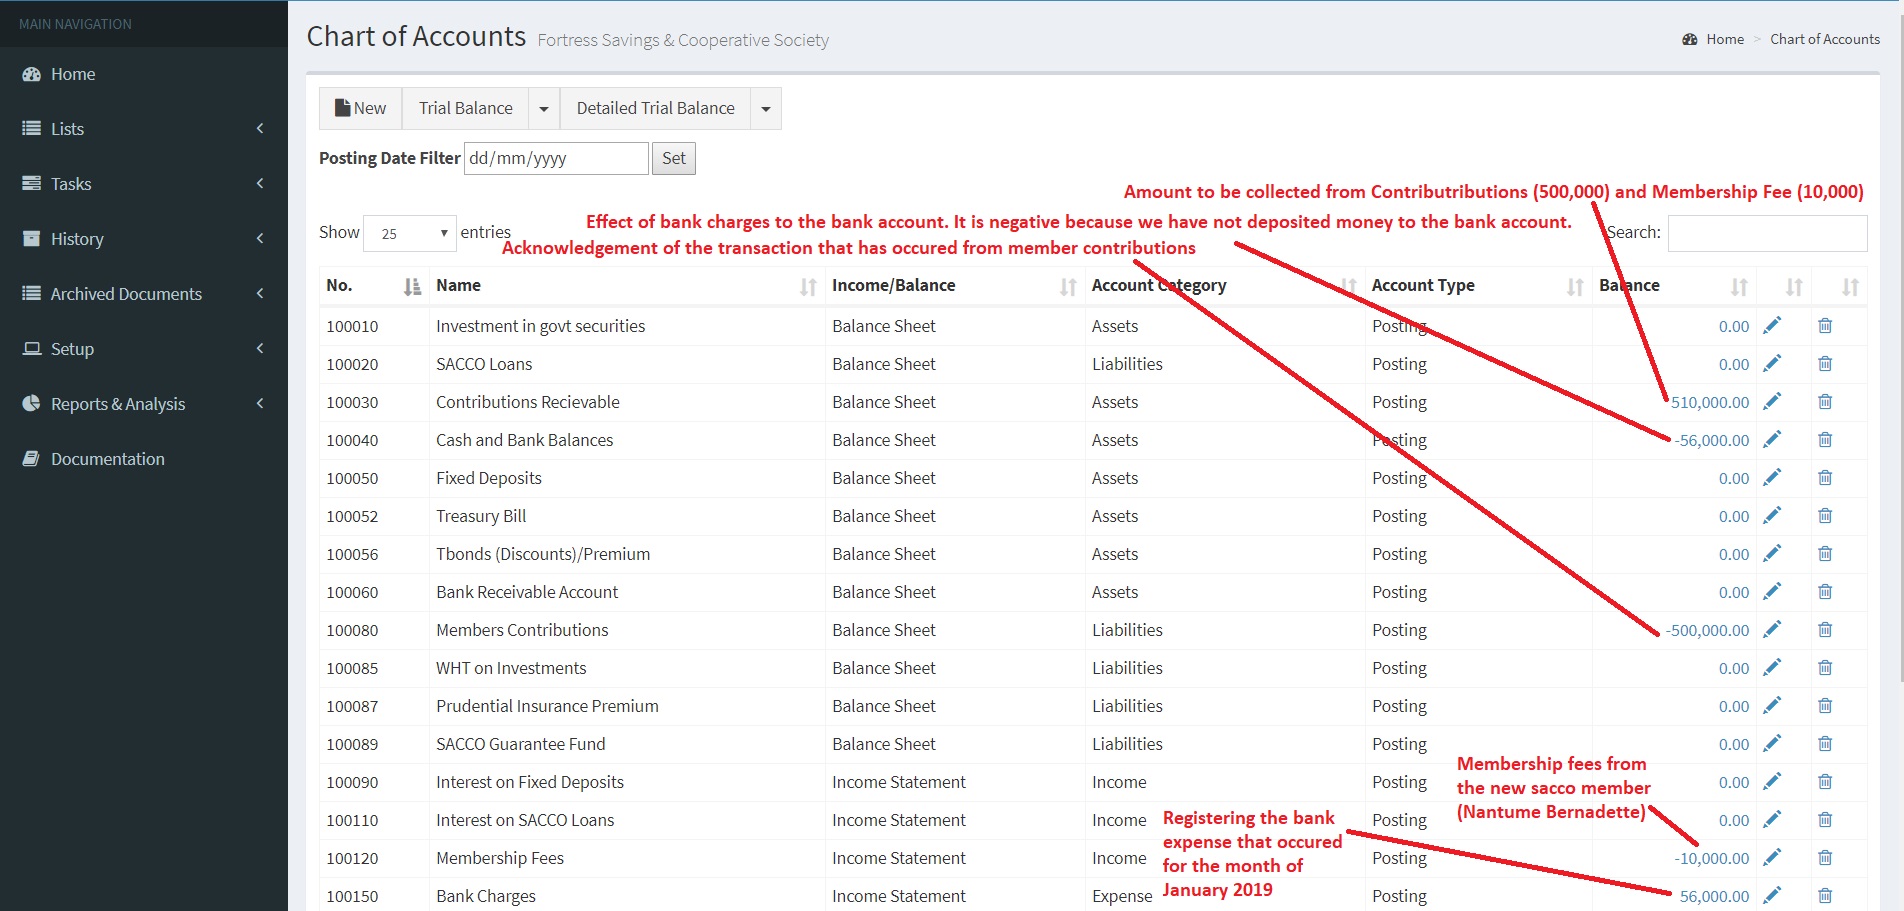
Note: All Contributions, Loan Repayments and Membership Fees are first posted on the Contributions Receivable Account. Once these payments have been collected from the Sacco members, thery are then transfered to the sacco bank as shown by the transaction below.
Debit: Sacco Bank Account
Credit: Contributions Receivable.
Below is the effect of the above transaction
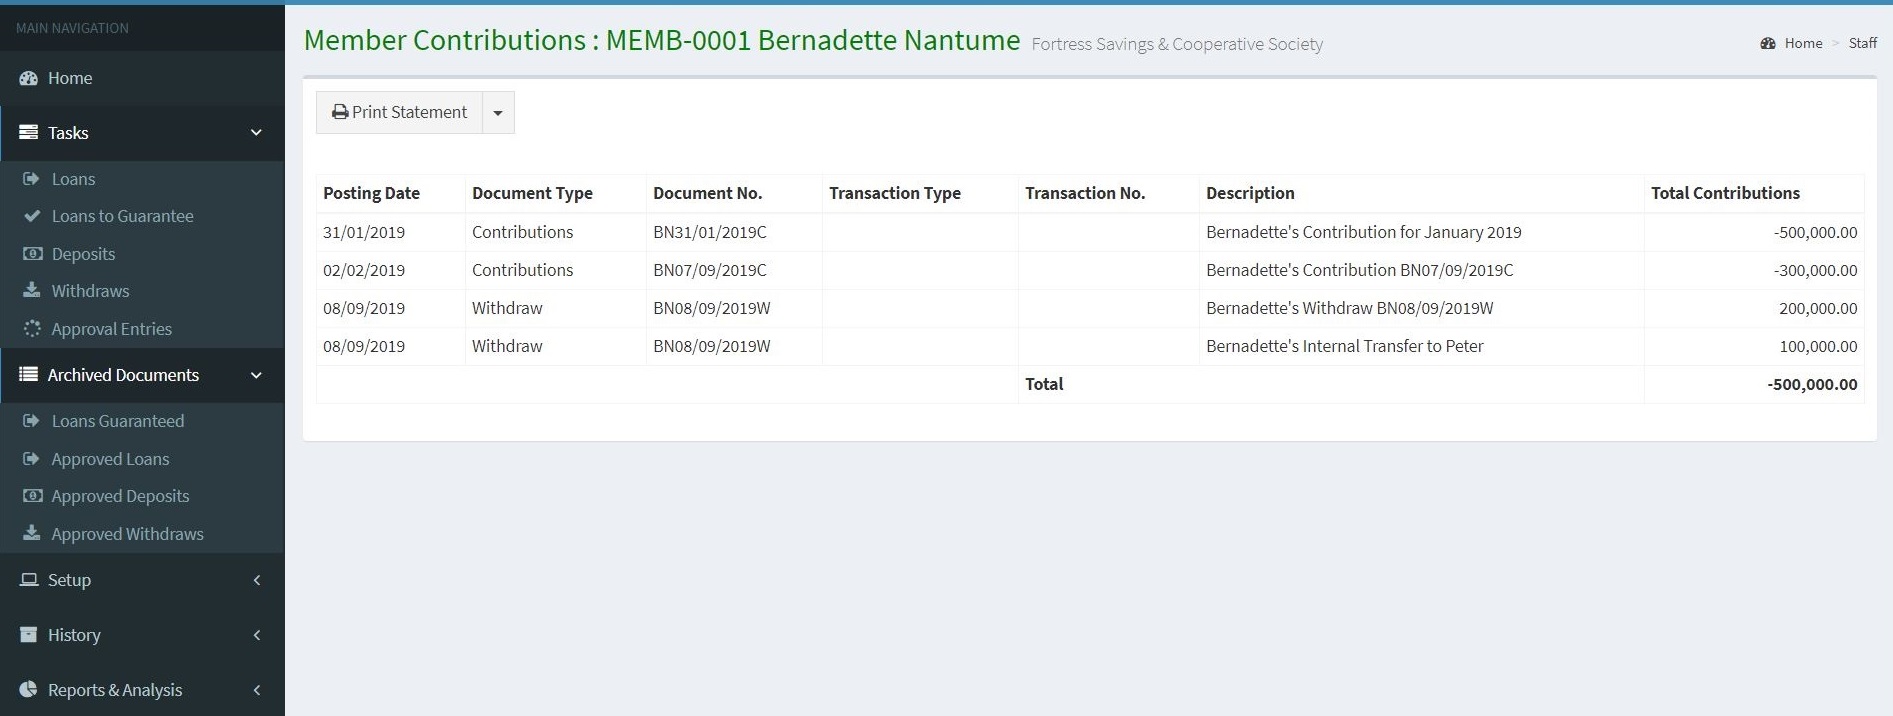
All transactions that relate to a SACCO member such as membership fee, loan repayments and member contributions are posted with Staff No./Sacco Member No. attached. This enables a user to retrieved member statements from the system.
Clicking on the balance field value (454,0000) of Cash and Bank balances account will display results as shown in the figure below
Self Service
The Sacco Management System allows sacco members to access their information and perform routine tasks with limited interaction with the sacco administrator. Sacco Members can download their member statements, make sacco deposits and requistions for sacco loans.
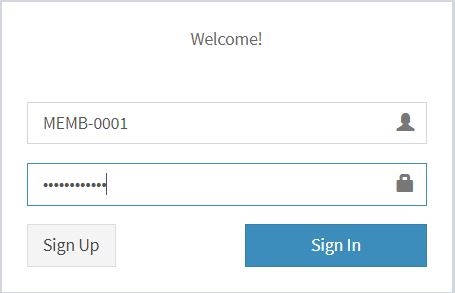
Every Sacco Member can log on to the Sacco Managment System using their Member No./Staff No. as the username and a default password that is provided by the SACCO administrator on creation of the Sacco.
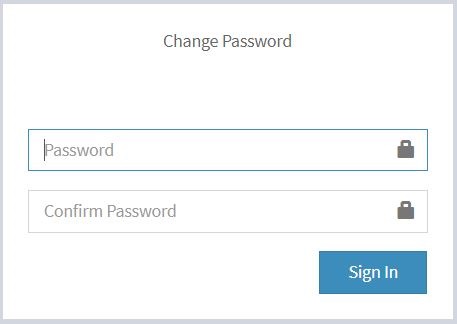
The system prompts the sacco member to change their password on first login.
Once the sacco member has successfully changed their password, the system will redirect them to the member home page as shown in the figure below
7.1. Deposits
Money can be deposited on the SACCO account either by using Mobile Money or through the Bank. Once the transaction has hit the SACCO account, the SACCO administrator can register the transaction through the journals to reflect in the SACCO ledgers.
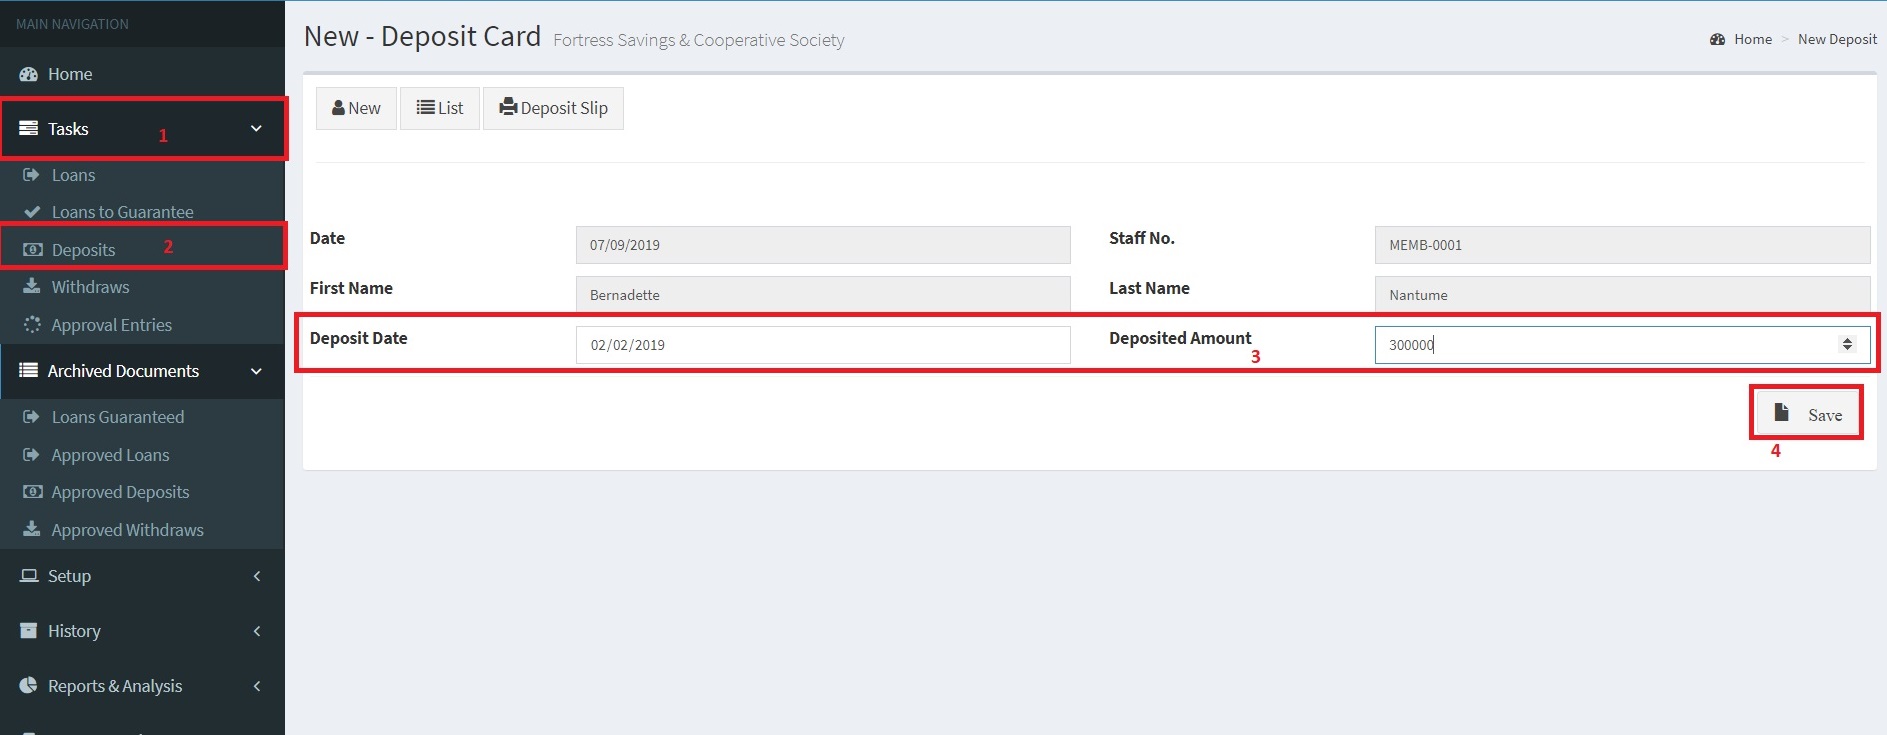
Alternatively, the SACCO member can also register the transaction by clicking "Deposits" under "Tasks" and then creating a new deposit using the Deposit Card as shown in the figure below.
The Date, Member No./Staff No., First Name and Last Name will be automatically populated by the system. The SACCO member is required to fill in only the "Deposit Date" and the "Amount" and then click the Save button. Once the record has been saved. The SACCO member then selects the "Edit" to attach a supporting document. (for example a scanned copy of the deposit slip in case money was deposited on the sacco bank account)
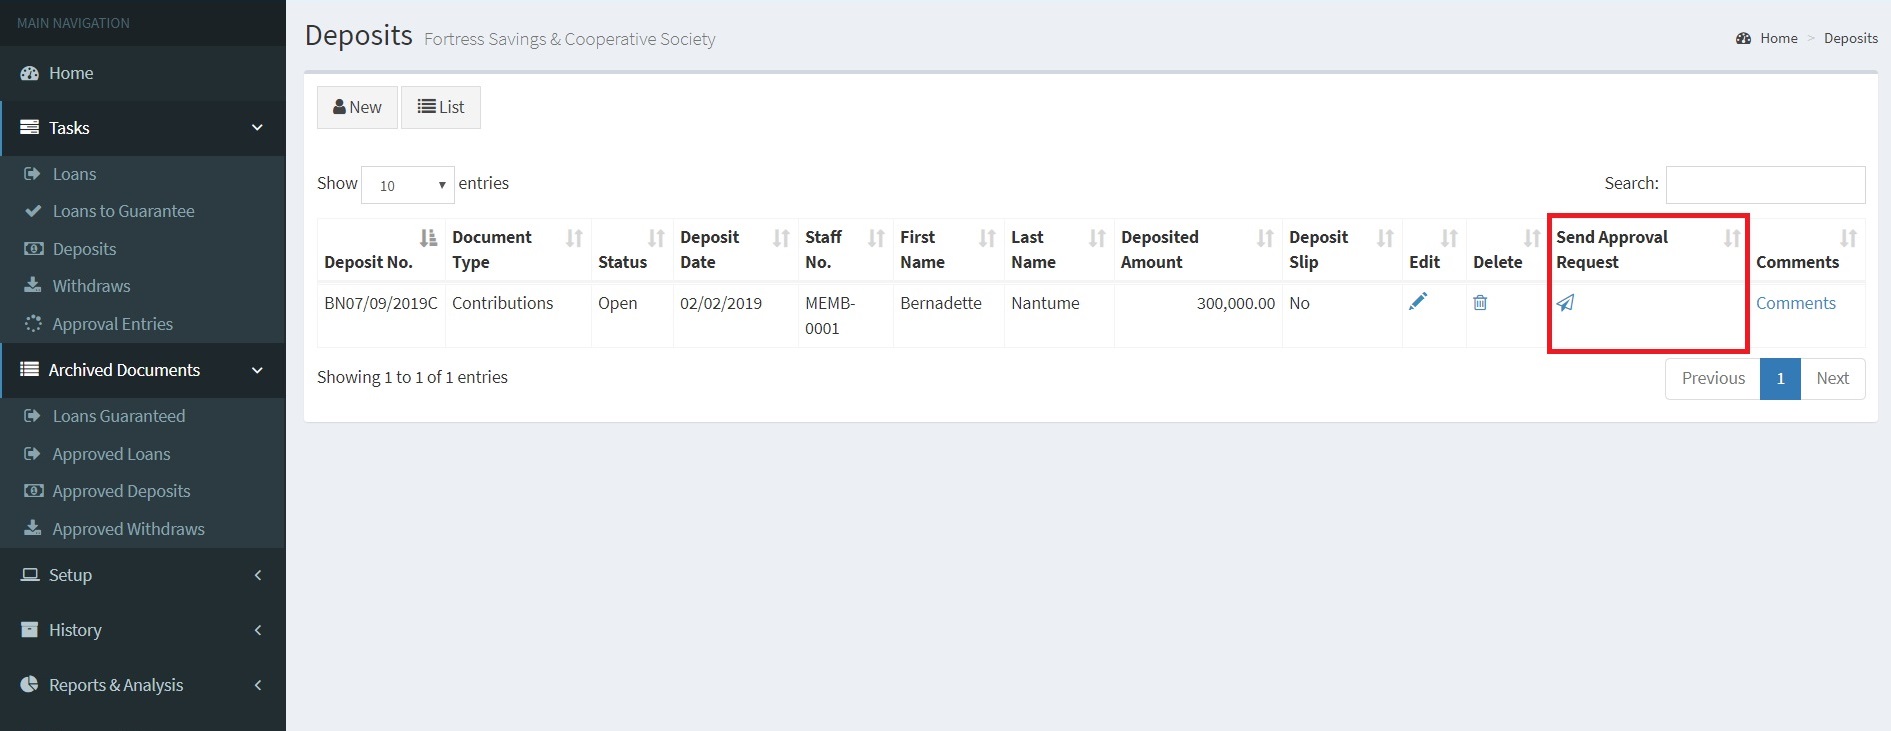
The record is then sent for approval
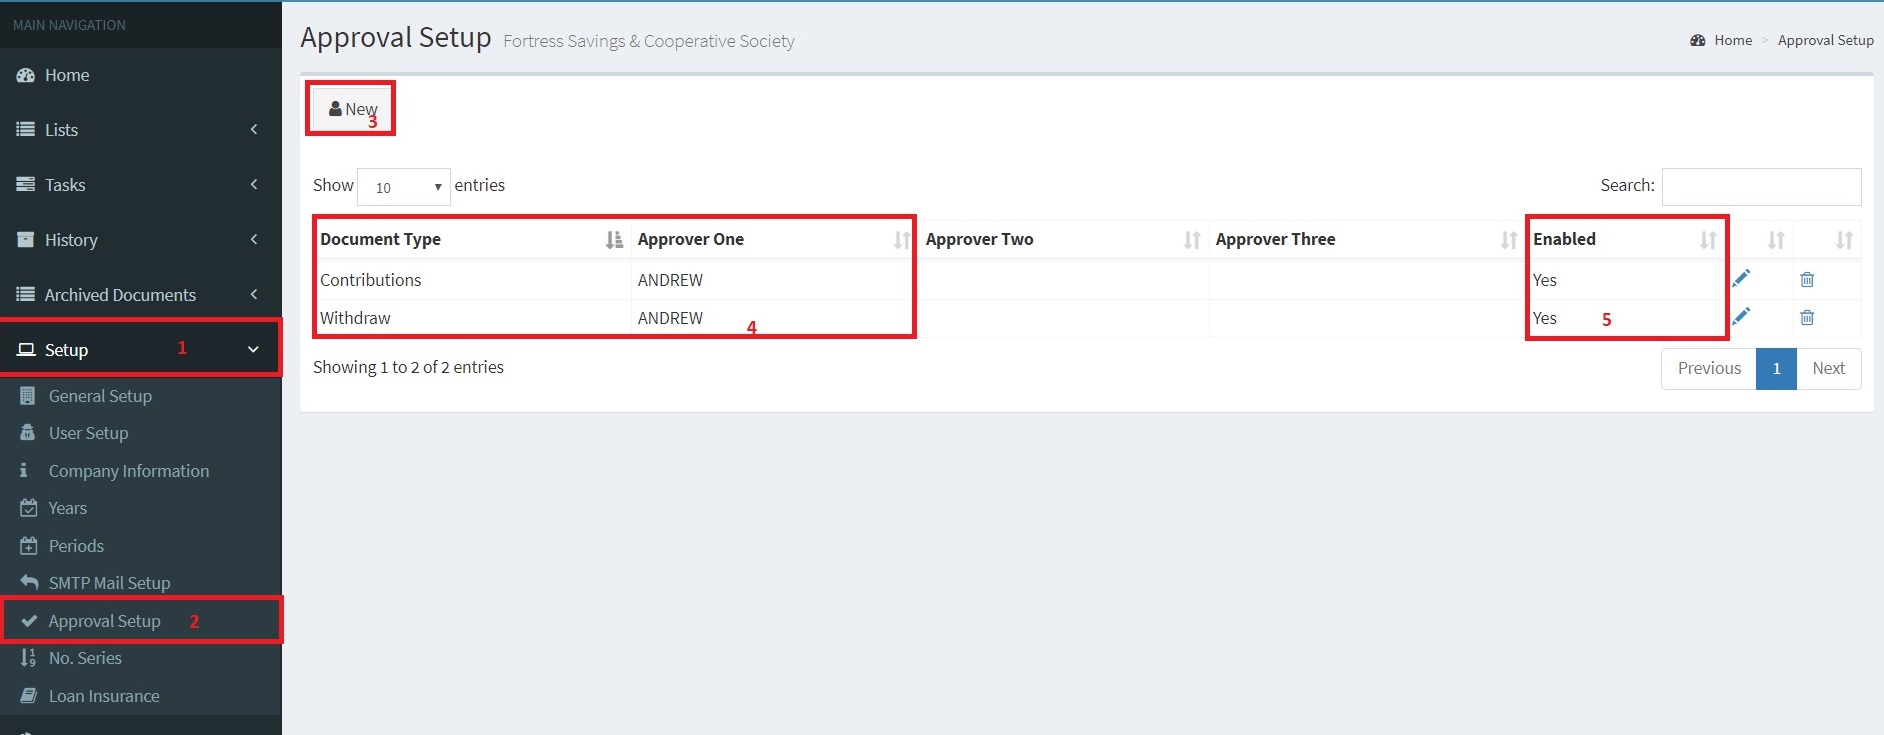
It should be noted that before sending the request for approval, the approval set up must be setup and enabled by the sacco administrator, otherwise the system will throw an error
The approval setup can be accessed as shown in the figure below
Click "Send Approval Request" action to send the withdraw request for approval.
The Sacco Administrator can approve Contributions, Withdraws, Loans and other document type through the "Requests To Approve" list page
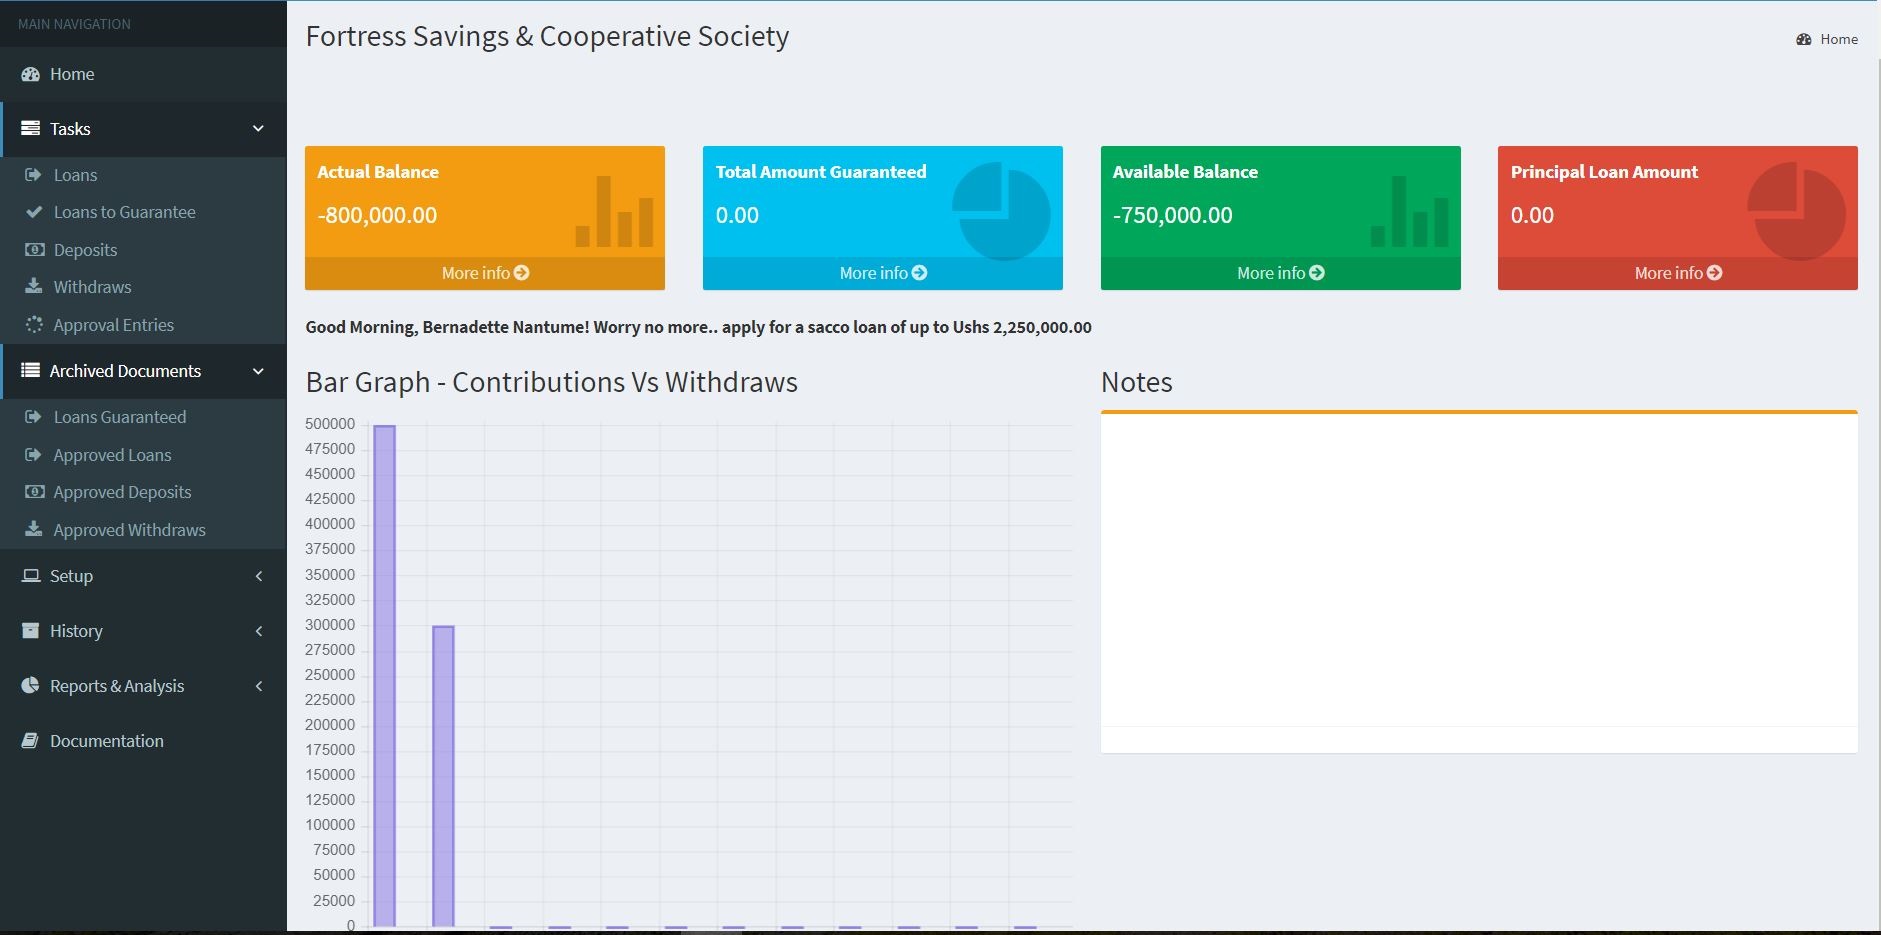
Once the deposit is approved, a journal line will be created ready to be posted by the SACCO administrator. The Posted transaction will then update the member balance.
After the deposit of 300,000 has been posted, the actual balance will increase from 500,000 to 800,000 as shown in the figure below
7.2. Withdraws
Members can initiate withdraws by using the withdraw card.
There are mainly three types of withdraws;
Normal - The SACCO member withdraws money for personal use.
nternal Transfer - SACCO member transfers money from their SACCO account to another member's account. Here, the beneficiary no. must be specified.
Loan Repayment - SACCO member transfers money to settle a pending loan repayment.
Note: Only the available balance i.e. actual balance less the minimum balance will be available for withdraw.
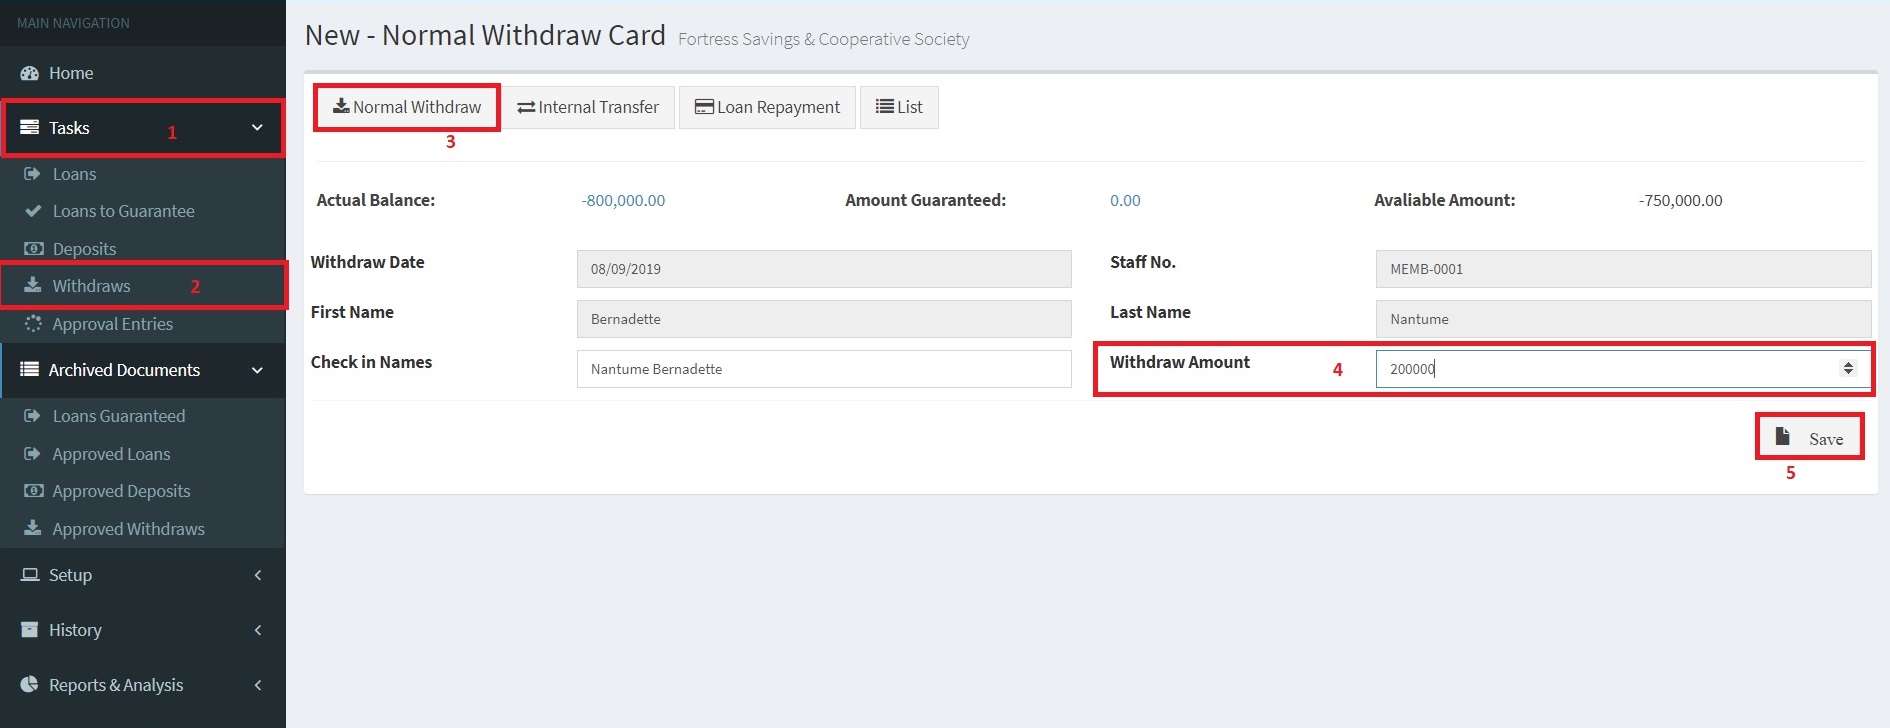
Normal Withdraw
Similar to the Deposit Card, the withdraw date, Staff No./Member No., First Name and Last Name will automatically populate basing on the logged in member.
In cases where the sacco needs to prepare a check, the sacco member can instruct the sacco accountant to prepare the check in another member's name by changing the "Check in Names" field
The withdraw amount is entered and the request sent for approval.
The approval and posting process of the general journal line is the same as that covered for the deposits. Please refer to 7.1. Deposits for more information
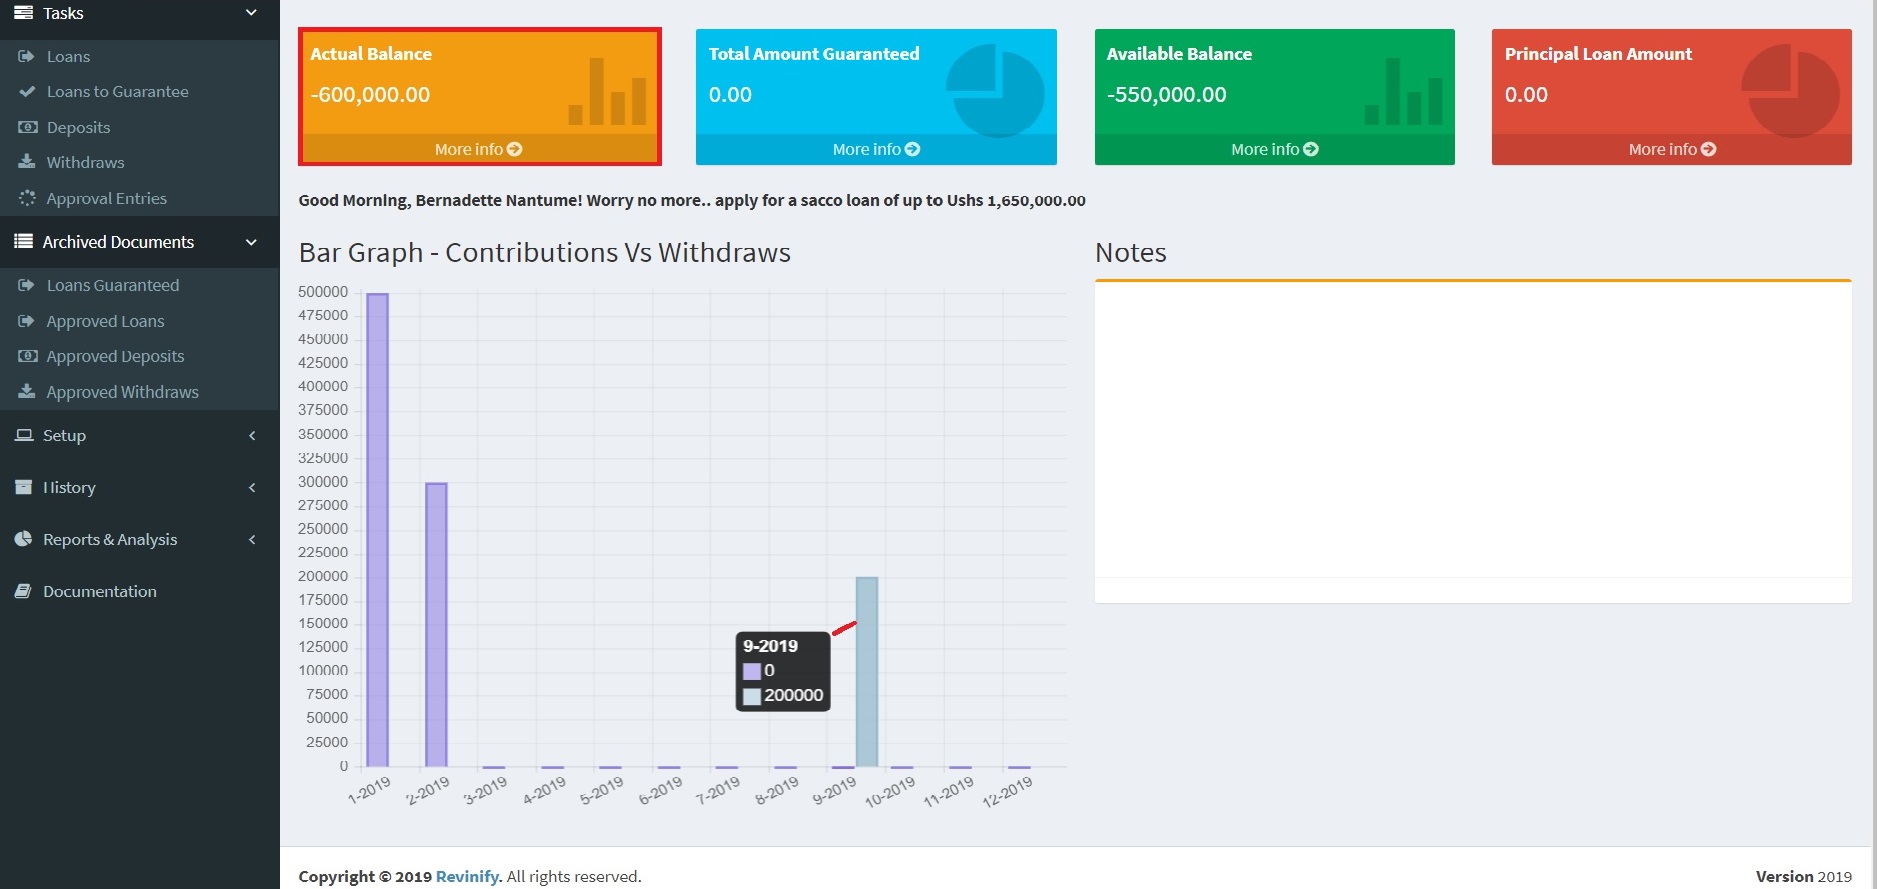
Once the normal withdraw of 200,000 has been posted, the actual balance will change from 800,000 to 600,000 as shown in the figure below.
Internal Transfers
Occassionally, a sacco member may want to transfer their savings to another sacco member for one reason or another
The Sacco Management System manages such withdraws though internal transfers.
The main difference between the Normal Withdraw and an Internal Transfer is that the with the Normal Withdraw, only the withdraw amount is specified whereas for Internal Transfers, both the withdraw amount and the Beneficary No. are specified.
In an accounting perspecitive, the Internal withdraw is both a withdraw by the Payee (the sacco member initiating the withdraw) and a deposit to the beneficary (the sacco member who receives the money from the payee).
The figure below illustrates how an Internal Withdraw is made
To complete this demostration, there must be atleast two sacco members, refer to 6.1. Create a Sacco Member for more details on how to create a sacco member.
The withdraw is saved and the request sent for approval.
The approval process and posting of the general journal line are the same as those covered for the deposits. Please refer to 7.1. Deposits for more information
Please note that for Internal transfer, two general journal lines are created. i.e. a withdraw from the bank as shown by the second line Bal. Account No. K-BANK-10000 and a deposit to the Bank as shown by the first line in the figure below.
Review the member statement for Bernadette by clicking "More Info ->" on the Actual Balance Tile under the member home page to visualize the effect of the internal stament on the Payee.
7.3. Loans
Request for a Loan
Sacco Members can request for loans by using the loan application module.
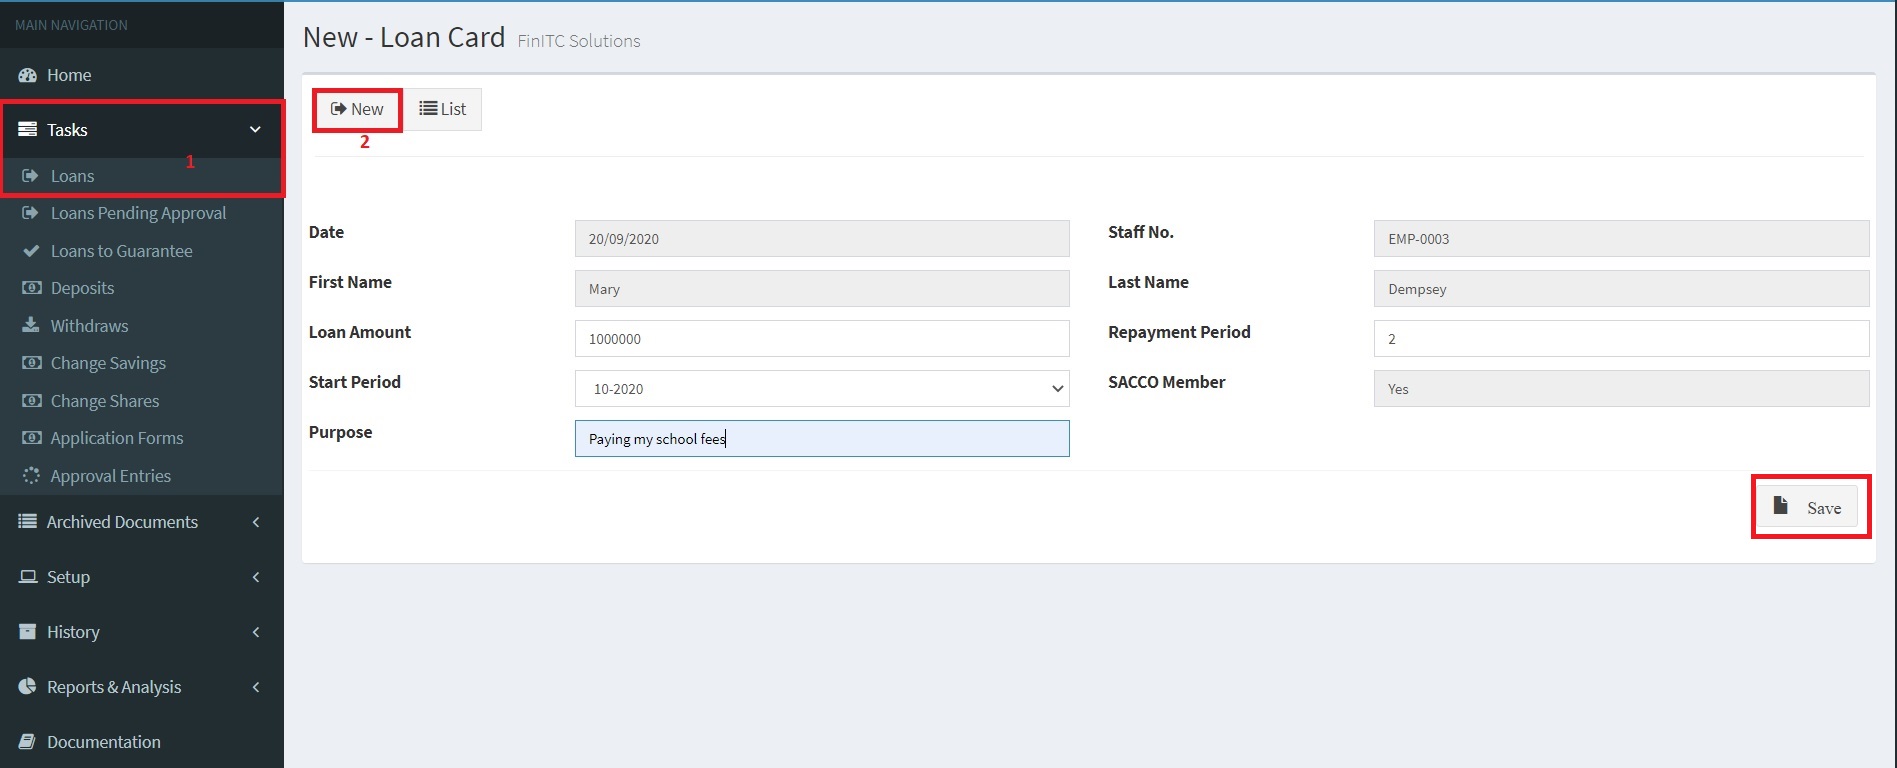
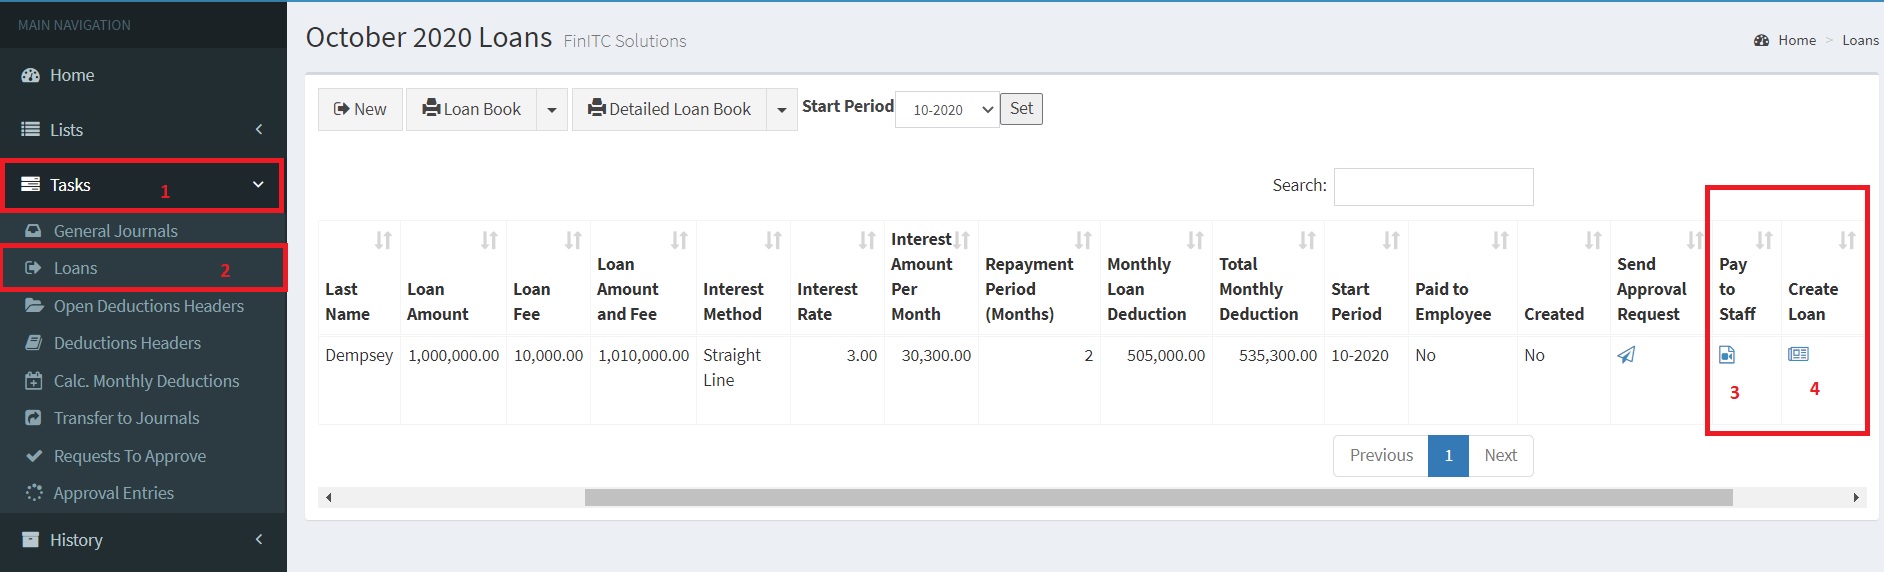
A loan can be created by clicking
1. Tasks > Loans
2. Click New
3. In the Loan Amount field, enter the Loan Amount
4. In the Repayment Period field, enter the number of months that it will take you to settle the loan
5. In the Start Period, enter the month in which you would want the loan deductions to start
6. In the Purpose field, enter the reason why you would want to take the loan
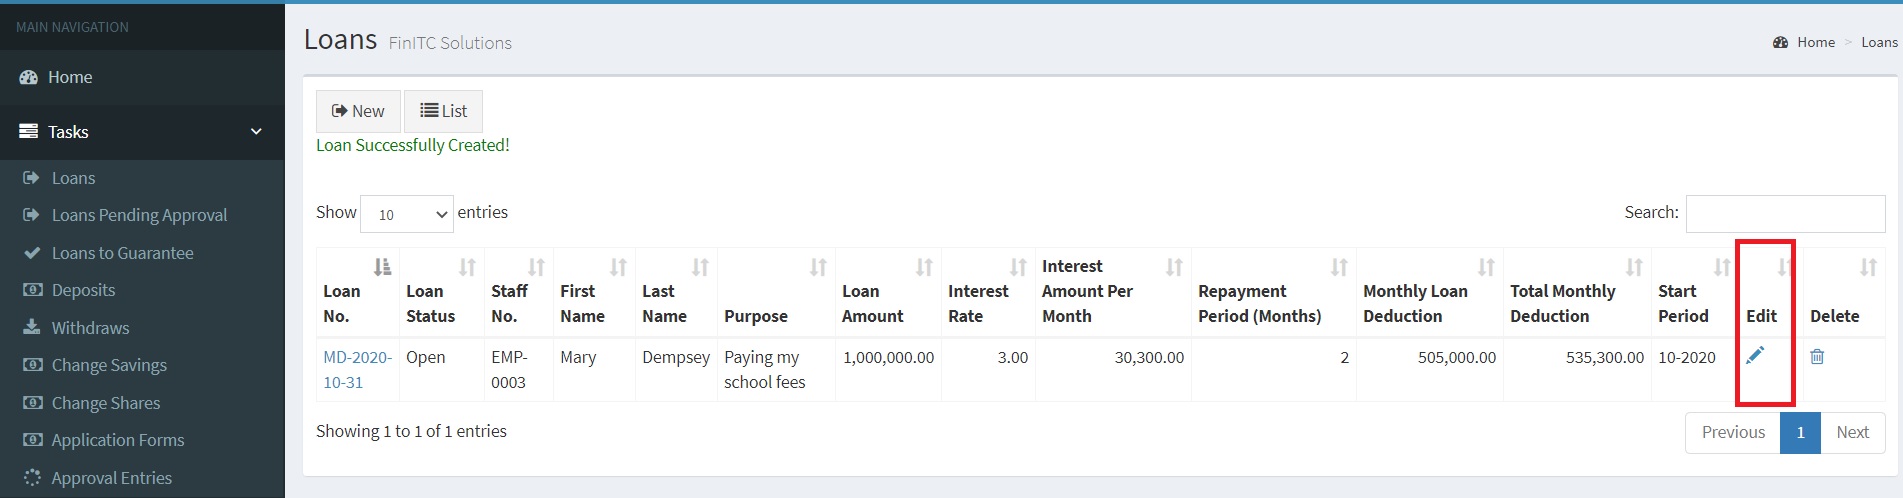
7. Click Save to create the record in the database
Add Loan Guarantors
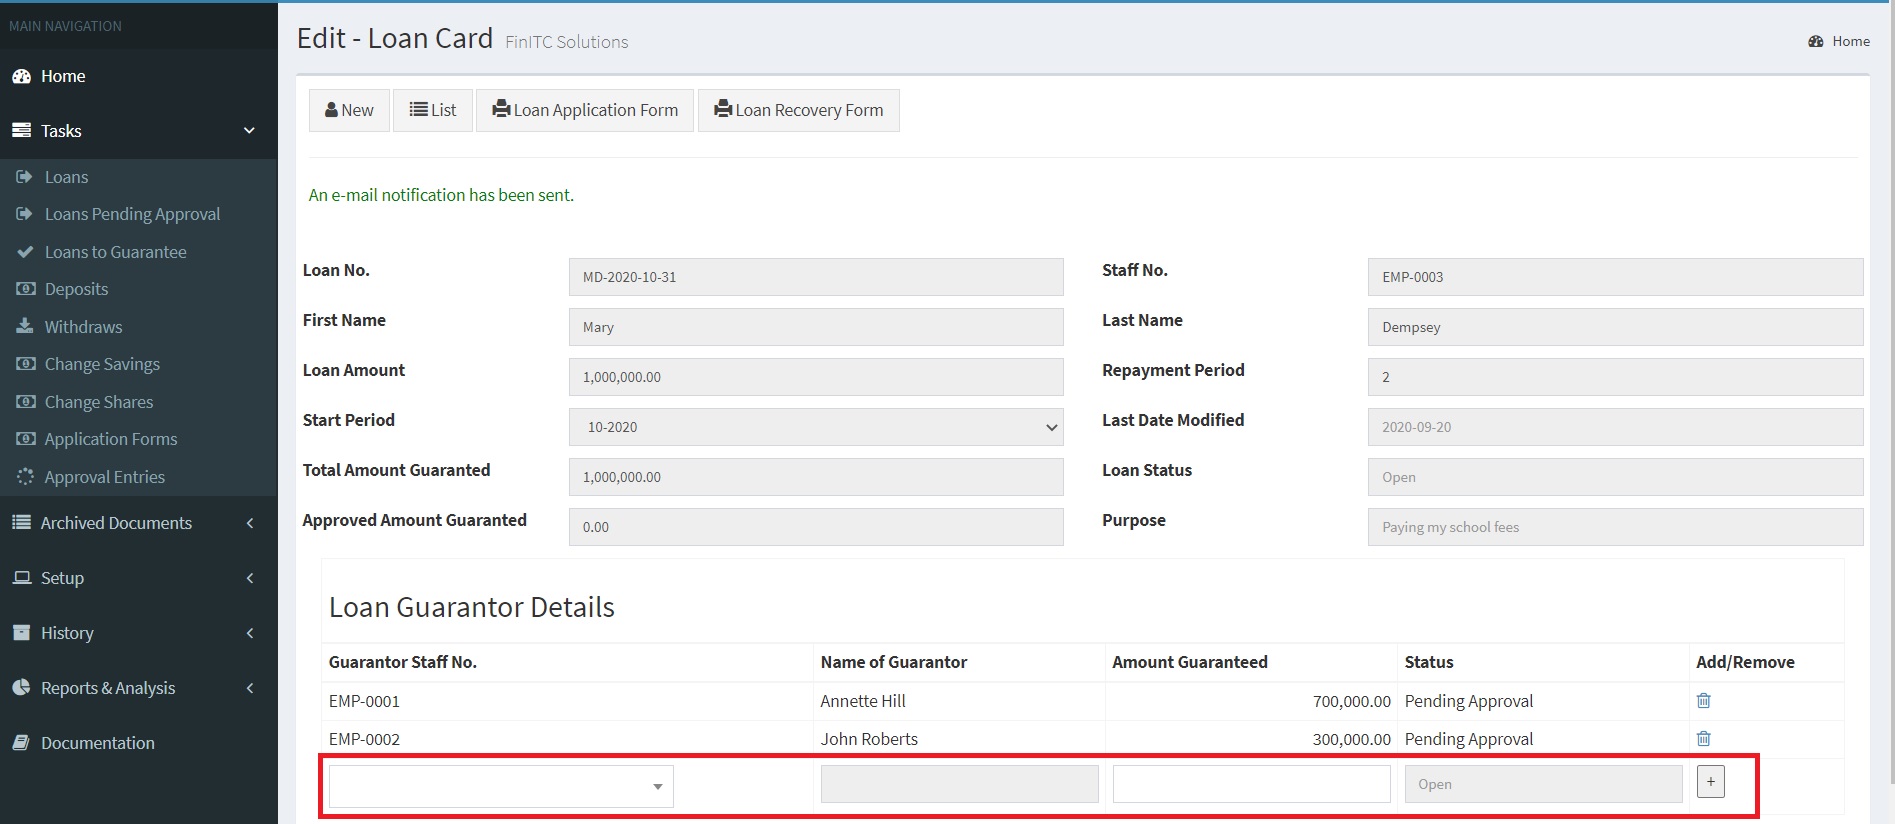
Click the Pencil (Edit) action to add loan guarantors
In the Loan Guarator Details List, Select the Guarantor Staff No. from the drop down list
In the Amount Guaranteed field, Enter the amount you would want the Guarantor to guarante
Click the Plus icon to add the line to the the list.
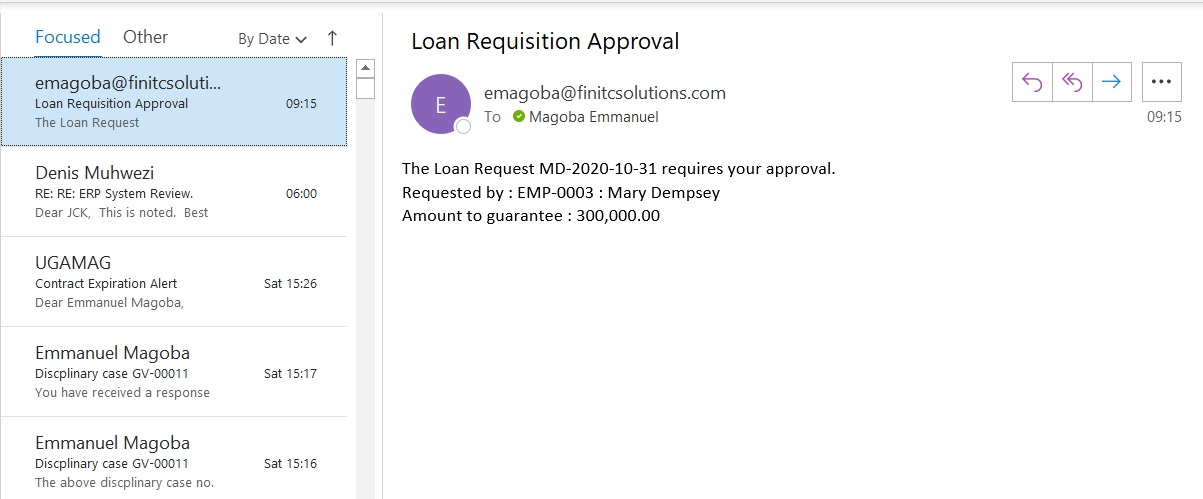
Adding a guarantor to the guarantor list will automatically send an e-mail notification to the guarantory notifying them about a pending request to approve
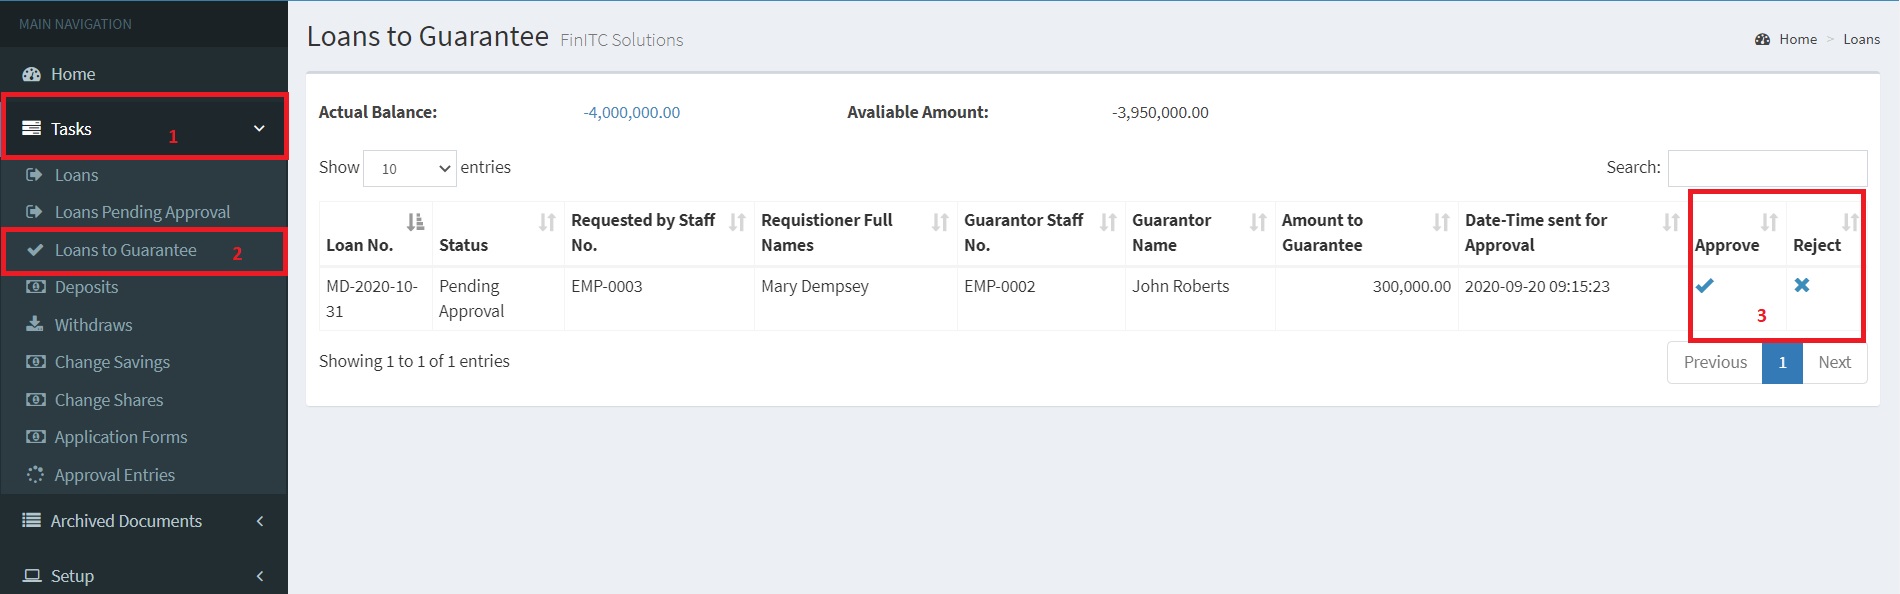
Loans to Guarantee
To Guarantee a loan, Click Loans to Guarantee under Tasks
Click either Approve or Reject
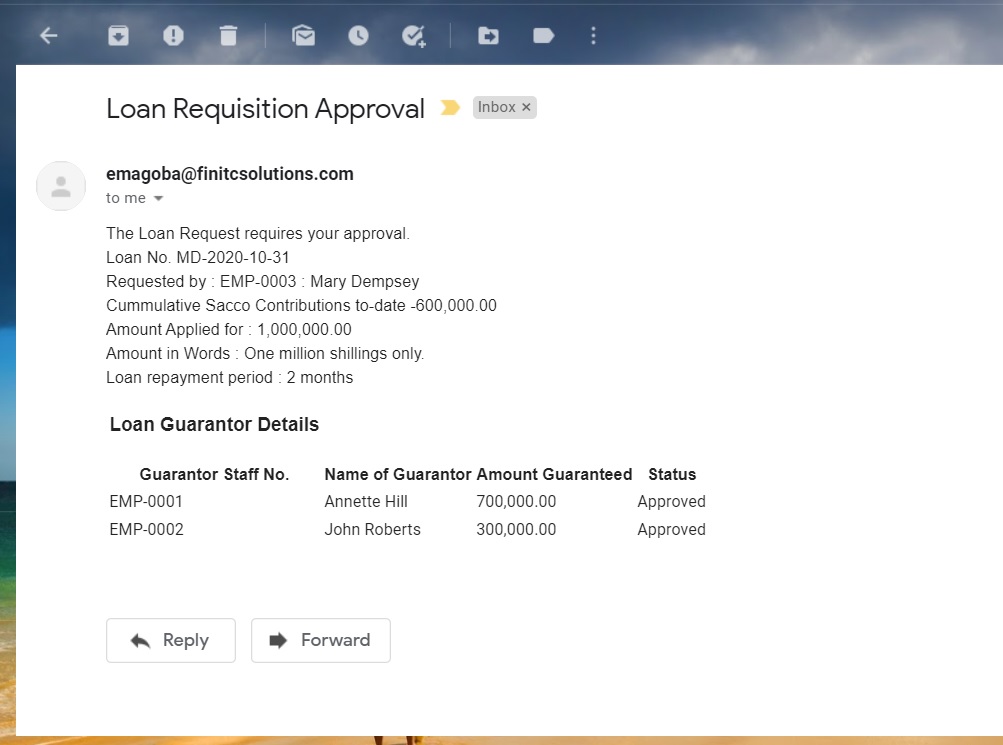
Once the Loan has been approved by all the guarantors, the system will send an e-mail notification to the loan committee member
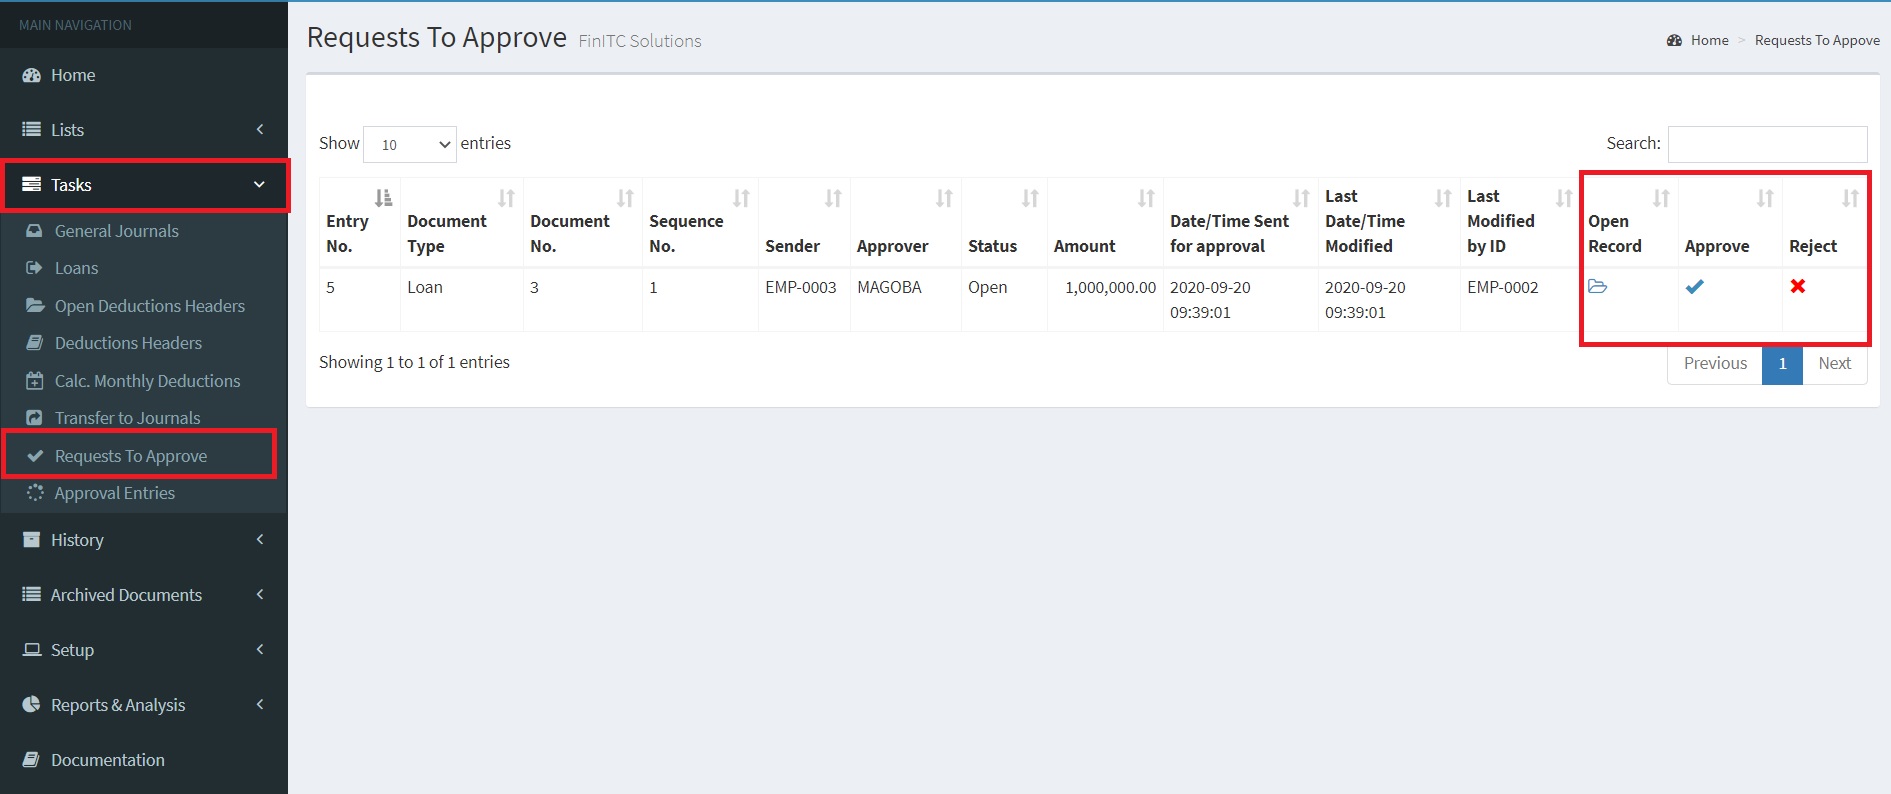
The Loan committe member logs on to the system as the adminitrator and approves the loan by click Request to Approve under Task
Once the Loan committe member approves the loan, the loan will become fully approved (Released)
The Loan application report can then be printed off by click the Print action and filed.
The next step is to Pay the loan to Staff by clicking the Pay to Staff. This automatically creates journal lines in the General Journals under the Loans batch
The Loan is also created by click the Create Loan action. This creates the loan amortization schedule that will be used to during the monthly loan deductions
Sacco Investments
8.1. Fixed Deposits
8.2. Treasury Bills
8.3. Treasury Bonds
FAQs
Explore a list of frequently asked questions (FAQs) and answers in relation to the FinITC Sacco Management System.
How do i change my password?
Select profile and click change password
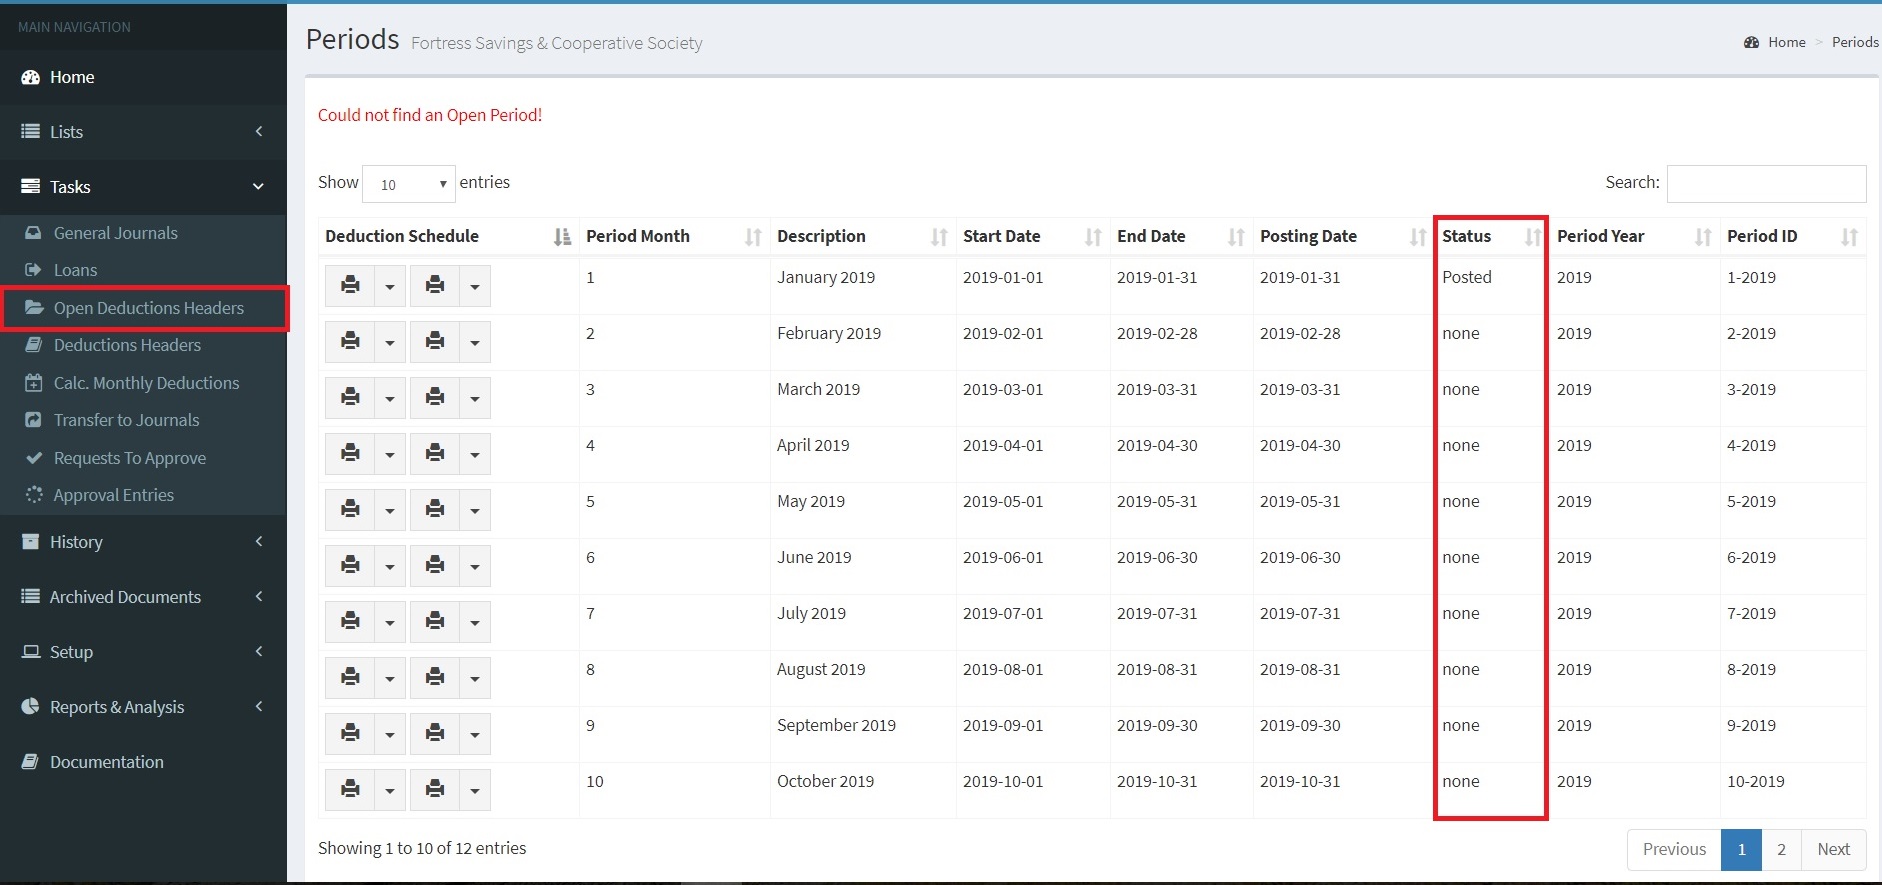
Could not find an open period?
Open new periods by clicking "Open Deduction Headers" under Tasks as shown in the figure below.